
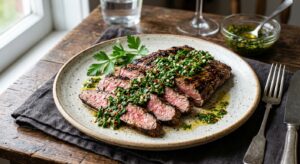
There is a reason the Mediterranean diet consistently tops longevity research, and this dish captures its essence in every bite. Bone-in, skin-on chicken thighs are among the most nutrient-dense cuts of poultry available, packing significant amounts of heme iron (the most bioavailable form), vitamin B6, zinc, and selenium into a relatively modest calorie package. Paired with creamy cannellini beans, which contribute non-heme iron and folate, and brightened with lemon zest and dried oregano, this recipe transforms humble pantry staples into a meal that works as hard nutritionally as it tastes extraordinary.
The real nutritional story here is the iron-absorption strategy baked right into the recipe. Vitamin C from fresh lemon juice chemically reduces ferric iron (Fe3+) to ferrous iron (Fe2+), the form your intestinal cells can actually absorb via divalent metal transporter-1. Studies show that as little as 50 mg of vitamin C consumed alongside a meal can increase non-heme iron absorption by two to four times. One lemon provides roughly 30 to 40 mg of vitamin C, and the acidity also brightens every other flavor in the dish. Vitamin B6 from the chicken supports haemoglobin synthesis downstream, making this a complete iron-metabolism meal rather than just an iron-rich one.
Cannellini beans deserve special recognition here. Each 100 g of cooked cannellini contributes approximately 3 mg of iron, meaningful amounts of folate, and roughly 6 g of fiber that feeds the gut microbiome and moderates blood sugar response. Slow-cooking or pressure-cooking the beans directly in the braising liquid allows them to absorb the savory fond from the chicken and the aromatic oils from the oregano, creating a unified, deeply flavored sauce without a drop of cream or added thickener.
4
servings
Ingredients
- 1200 gbone-in, skin-on chicken thighs (about 4 large thighs, approximately 300 g each)
- 480 gcanned cannellini beans, drained and rinsed (two 240 g drained cans)
- 1 largelemon, zested and juiced (about 3 tbsp juice and 1 tsp zest)
- 2 tbspextra-virgin olive oil
- 1 mediumyellow onion, finely diced (about 160 g)
- 6 clovesgarlic, thinly sliced
- 240 mllow-sodium chicken stock
- 400 gcanned crushed tomatoes
- 2 tbspdried oregano
- 1 tspsmoked paprika
- 0.5 tspcrushed red pepper flakes
- 1 tbsptomato paste
- 30 gfresh flat-leaf parsley, roughly chopped (for serving)
- 1 tspColima Sea SaltMicroplastic Free Salt, divided
- —Freshly ground black pepper to taste
- —Extra lemon wedges for serving
Instructions
Click on an item below to shop for the recommended items for this recipe on Amazon.
As an Amazon Associate, we earn from qualifying purchases.
- Pat the chicken thighs completely dry with paper towels. This is not optional: surface moisture is the enemy of a good sear. Season both sides generously with 0.75 tsp of the salt and several grinds of black pepper. Let them sit at room temperature while you prep the aromatics.
- Heat the olive oil in a large Dutch oven or heavy braising pan over medium-high heat until it shimmers but does not smoke. Place the chicken thighs skin-side down in a single layer. Do not move them for 6 to 8 minutes. You are looking for a deep golden-brown crust that releases naturally from the pan. Flip and sear the flesh side for 3 minutes. Transfer to a plate; the chicken will not be cooked through yet.
- Reduce the heat to medium. Pour off all but about 1 tbsp of the rendered fat from the pan. Add the diced onion to the remaining fat and cook, stirring occasionally, for 4 to 5 minutes until softened and beginning to turn golden at the edges. Add the sliced garlic, oregano, smoked paprika, and red pepper flakes. Stir constantly for 60 seconds until the garlic is fragrant and the dried herbs bloom in the fat.
- Add the tomato paste and stir it into the aromatics for 90 seconds, allowing it to caramelize slightly and deepen in color. Pour in the chicken stock and use a wooden spoon to scrape up every bit of browned fond from the bottom of the pan. Those caramelized bits are concentrated flavor and the foundation of your sauce.
- Add the crushed tomatoes, lemon zest, and drained cannellini beans. Stir to combine. Nestle the seared chicken thighs back into the pot skin-side up, making sure they sit above the liquid so the skin can crisp rather than steam. Bring to a gentle simmer over medium heat.
- Cover the pot, reduce heat to low, and braise for 20 to 25 minutes until the chicken is cooked through and registers 74 degrees Celsius (165 degrees Fahrenheit) on an instant-read thermometer. For extra crispy skin, remove the lid for the final 8 minutes and increase heat slightly. Stir in the fresh lemon juice, taste and adjust seasoning with remaining salt and pepper. Scatter fresh parsley over the top and serve with lemon wedges.
- Build the braising base directly in the slow cooker insert before adding any protein. Combine the drained cannellini beans, diced onion, sliced garlic, crushed tomatoes, chicken stock, tomato paste, oregano, smoked paprika, red pepper flakes, lemon zest, 0.75 tsp salt, and black pepper. Stir well so the tomato paste is fully incorporated and not in clumps. This base approach is specific to slow cooking: because you cannot deglaze a slow cooker, building the sauce directly in the insert ensures the aromatics are evenly distributed from the start.
- Pat the chicken thighs dry and season both sides with the remaining 0.25 tsp salt and black pepper. Unlike the stovetop method, you are skipping the sear here to preserve the slow cooker’s low-and-slow simplicity. If you have an extra 10 minutes and want maximum depth of flavor, sear the thighs in a skillet with the olive oil first, then add 60 ml of stock to the skillet and scrape the fond into the slow cooker insert. Either way, nestle the seasoned thighs skin-side up on top of the bean mixture, pressing them gently so they are partially submerged.
- Drizzle the olive oil over the tops of the chicken pieces. Place the lid on the slow cooker. Cook on Low for 6 to 7 hours or High for 3 to 3.5 hours. The long, gentle heat will allow the collagen in the bone-in thighs to dissolve slowly, enriching the braising liquid with body and gelatin that no quick-cook method can replicate. Avoid lifting the lid during cooking, as each peek adds approximately 20 minutes to the cook time.
- About 15 minutes before serving, preheat your oven broiler to high. Use tongs to carefully transfer the cooked chicken thighs skin-side up onto a foil-lined baking sheet. Broil 10 to 15 cm from the element for 3 to 4 minutes, watching closely, until the skin is golden, bubbling, and crisped. The interior is already fully cooked, so you are only crisping the surface.
- While the chicken broils, stir the fresh lemon juice into the bean mixture in the slow cooker. Taste and adjust seasoning. The sauce will be slightly thinner than the stovetop version; if you prefer a tighter consistency, use a slotted spoon to remove the beans to a bowl, then pour the liquid into a small saucepan and reduce over medium-high heat for 5 to 8 minutes before recombining. Return the broiled chicken thighs to the insert or arrange over the beans in a serving dish. Finish with fresh parsley and lemon wedges.
- Select the Saute function on High (or use a stovetop pressure cooker over medium-high heat). Add the olive oil and heat until shimmering. Pat the chicken thighs dry and season with 0.75 tsp salt and black pepper. Sear skin-side down for 5 to 6 minutes without moving until deeply golden. Flip and sear the flesh side for 2 minutes. Transfer to a plate. The Saute function makes pressure-cooker searing as effective as stovetop, and unlike the slow cooker method, this step is strongly recommended because the sealed environment of pressure cooking concentrates all flavors, including any bitter or flat notes from un-browned chicken.
- Without wiping out the pot, add the diced onion to the remaining fat. Saute for 3 minutes, scraping up the fond as the onion softens. Add the garlic, oregano, smoked paprika, and red pepper flakes. Stir for 45 seconds. Add the tomato paste and stir for 60 seconds. Pour in the chicken stock immediately and scrape the bottom of the pot thoroughly with a wooden spoon until no brown bits remain stuck. This deglaze step is critical for pressure cookers: any food stuck to the bottom can trigger a Burn warning and interrupt cooking.
- Add the crushed tomatoes, lemon zest, remaining 0.25 tsp salt, and drained cannellini beans. Stir to combine. Nestle the seared chicken thighs on top, skin-side up. The thighs should sit above or at the surface of the liquid, not submerged. This positioning ensures the beans and sauce absorb maximum chicken fat and the skin stays as intact as possible under pressure.
- Secure the lid and set the valve to Sealing. Select Pressure Cook (Manual) on High for 15 minutes. The pot will take approximately 8 to 10 minutes to come to pressure. Once the cook cycle ends, allow a natural pressure release for at least 10 minutes before carefully turning the valve to Venting to release any remaining steam. Open the lid away from you.
- The chicken will be fully cooked and the beans will be wonderfully creamy from absorbing the braising liquid under pressure. For crispy skin, use tongs to transfer the thighs to a foil-lined baking sheet and broil under a high broiler for 3 to 4 minutes. While they broil, stir the fresh lemon juice into the sauce, taste for seasoning, and if the sauce seems thin, select Saute on High and reduce uncovered for 3 to 5 minutes, stirring occasionally. Plate the beans and sauce, top with the crisped chicken, and finish with fresh parsley and lemon wedges.
- Preheat your oven to 190 degrees Celsius (375 degrees Fahrenheit). Pat the chicken thighs completely dry and season both sides with 0.75 tsp salt and black pepper. Heat the olive oil in a large oven-safe skillet or Dutch oven over medium-high heat on the stovetop. Sear the thighs skin-side down for 6 to 7 minutes until the skin is a deep amber color and the fat has rendered visibly into the pan. Flip briefly and sear the flesh side for 2 minutes, then transfer to a plate.
- Reduce the stovetop heat to medium. Add the diced onion to the rendered fat and cook for 4 minutes until softened. Add the garlic, oregano, smoked paprika, and red pepper flakes and stir for 60 seconds. Add the tomato paste and stir for 90 seconds until it darkens slightly. Pour in the chicken stock and scrape the pan bottom to deglaze completely. Add the crushed tomatoes, lemon zest, remaining 0.25 tsp salt, and cannellini beans. Stir to combine and bring to a gentle simmer.
- Nestle the seared chicken thighs skin-side up into the bean mixture. The skin should sit completely above the liquid line. The oven’s dry, circulating heat will render the skin to a crackling finish that no lid-on braising method achieves. If your skillet has a lid, leave it off for the entire oven cook.
- Transfer the uncovered skillet to the preheated oven. Roast for 35 to 40 minutes. At the 25-minute mark, check the bean mixture and stir gently around the chicken to prevent any sticking at the pan edges. If the sauce appears to be reducing too aggressively, add a splash of water or stock. The dish is ready when the chicken skin is deep golden and crackly and an instant-read thermometer inserted into the thickest part of the thigh reads 74 degrees Celsius (165 degrees Fahrenheit).
- Remove from the oven and let rest for 5 minutes before serving. The resting period allows the juices to redistribute back into the muscle fibers rather than running onto the plate. Stir the fresh lemon juice into the beans and sauce around the chicken, taste for seasoning, and scatter fresh parsley generously over the entire pan. Bring the whole skillet to the table for a dramatic presentation, with lemon wedges alongside.
Nutrition Breakdown
Per 1 serving (makes 4)
Vitamins & Minerals
% Daily Value based on a 2,000 calorie diet (FDA reference)
🧬 Essential Amino Acids
% of recommended daily intake (RDA) per serving
🛡 Antioxidant Profile
The Nutrition Science
The iron story in this dish operates on two simultaneous tracks. Bone-in chicken thighs supply heme iron, bound within myoglobin and hemoglobin molecules, which is absorbed at a rate of 15 to 35% regardless of other dietary factors. The cannellini beans contribute non-heme iron, absorbed at a more variable rate of 2 to 20% depending heavily on what else is in the meal. The fresh lemon juice solves this problem chemically: ascorbic acid (vitamin C) donates electrons to reduce Fe3+ (ferric, non-absorbable) to Fe2+ (ferrous, absorbable), and also forms a soluble iron-ascorbate chelate that resists precipitation by phytates, the anti-nutrients naturally present in legumes. The result is a combined iron bioavailability far superior to eating either food in isolation.
Vitamin B6 (pyridoxine) from the chicken thighs plays a less visible but equally important metabolic role. B6 is a cofactor for aminolevulinic acid synthase, the rate-limiting enzyme in heme biosynthesis, meaning that without adequate B6, your body cannot efficiently convert the iron you absorb into functional hemoglobin. A single serving of this dish provides approximately 1.1 mg of B6, covering 65% of the adult RDA, which is meaningful given that up to 24% of adults in Western populations fail to meet daily B6 requirements. The combination of iron and B6 in one meal is nutritionally synergistic in a way that supplementation with either alone cannot fully replicate.
The soluble fiber in cannellini beans, primarily consisting of resistant starch and pectin-like polysaccharides, exerts a prebiotic effect in the colon that modulates iron absorption indirectly. A healthy gut microbiome reduces intestinal inflammation, and chronic low-grade gut inflammation is associated with upregulation of hepcidin, the hormone that inhibits iron absorption at the enterocyte level. By feeding beneficial Bifidobacterium and Lactobacillus species, the legume fiber in this dish may help maintain the low-hepcidin environment that allows efficient iron uptake over the long term.
Pro Tips
- If using dried cannellini beans instead of canned, soak 240 g of dried beans overnight, then simmer for 60 to 70 minutes until just tender before proceeding. Dried beans will give you a creamier, more cohesive texture in the finished dish and reduce sodium by roughly 200 mg per serving.
- To maximize the vitamin C-iron absorption synergy, add the lemon juice only at the very end of cooking or at the table. Prolonged heat above 70 degrees Celsius destroys ascorbic acid rapidly, and you want it active in your digestive system, not oxidized in the pot.
- Bone-in thighs are non-negotiable for optimal flavor and nutrition here. The bone releases gelatin and minerals (including small amounts of calcium and phosphorus) into the braising liquid during cooking, creating a sauce with natural body. Boneless thighs will cook faster but produce a noticeably thinner, less flavorful result.


This looks amazing, but I’d flag that canned white beans can be problematic for those with histamine issues (the canning process and storage bump up histamine levels significantly). If you have MCAS or histamine intolerance like me, I’d suggest cooking dried beans from scratch or using frozen ones instead, which stay much lower-histamine. The fresh lemon and oregano are great, though, and bone broth from the chicken thighs would give you even better mineral absorption for that iron content you mentioned!
oh good call on the histamine thing, that’s legit important for people dealing with that! honestly i hadnt thought about canning affecting histamine levels but that makes total sense given how long theyre sitting. dried or frozen is definitely the move then, and yeah the bone broth angle is chef’s kiss for mineral bioavailability, especially with that iron – ive been simmering thigh bones for stock post-WOD and the collagen + iron combo hits different for recovery. do you find the fresh lemon helps with iron absorption too or is that more of a flavor win for you?
Lemon is absolutely pulling double duty here, and I love that you caught it. That vitamin C from fresh citrus genuinely boosts non-heme iron absorption significantly, so it’s not just flavor, it’s strategy – especially important since white beans are plant-based iron and need that acidic environment to absorb optimally. The thigh bones for stock is chef’s kiss though, because you’re getting heme iron from the meat itself plus those minerals from collagen extraction, which your body absorbs way better than isolated supplements. Post-WOD timing on this is solid too since you’re hitting leucine from the protein and the B6 supports amino acid metabolism during recovery.
This is exactly the kind of synergistic nutrient pairing I geek out over, Paul. I’ve been tracking my CGM responses to similar meals and consistently see lower post-meal glucose spikes when I include that acidic component with plant-based iron sources, probably because the vitamin C is doing the heavy lifting on absorption efficiency. Have you measured any difference in your iron labs since you started being intentional about the lemon + white bean combo, or are you mostly going by how you feel recovery-wise?
Oh Lorraine, thank you for that heads up! I’ve actually been experimenting with this exact swap postpartum because I was worried about histamine affecting my milk supply and my recovery (turns out I’m sensitive too). I’m curious though, do you find the B6 content holds up similarly when you cook beans from scratch, or have you noticed a difference in how you feel on this recipe versus canned? I’m still learning which nutrient losses matter most for my situation, and honestly the iron + B6 combo here is gold for postpartum anemia prevention so I want to make sure I’m maximizing it.
yo this is basically a post-WOD dream meal, right? thighs are legit one of my fave recovery proteins because theyre way more nutrient dense than breast, plus that B6 is gonna help with glycogen replenishment and reducing inflammation after a hard session. ive been doing similar braised stuff but gonna steal the lemon oregano combo because both are solid anti-inflammatory players. quick question though, does the braising liquid stay in or do you drain it? asking because if theres collagen breakdown happening in there, id wanna keep that for joint recovery.