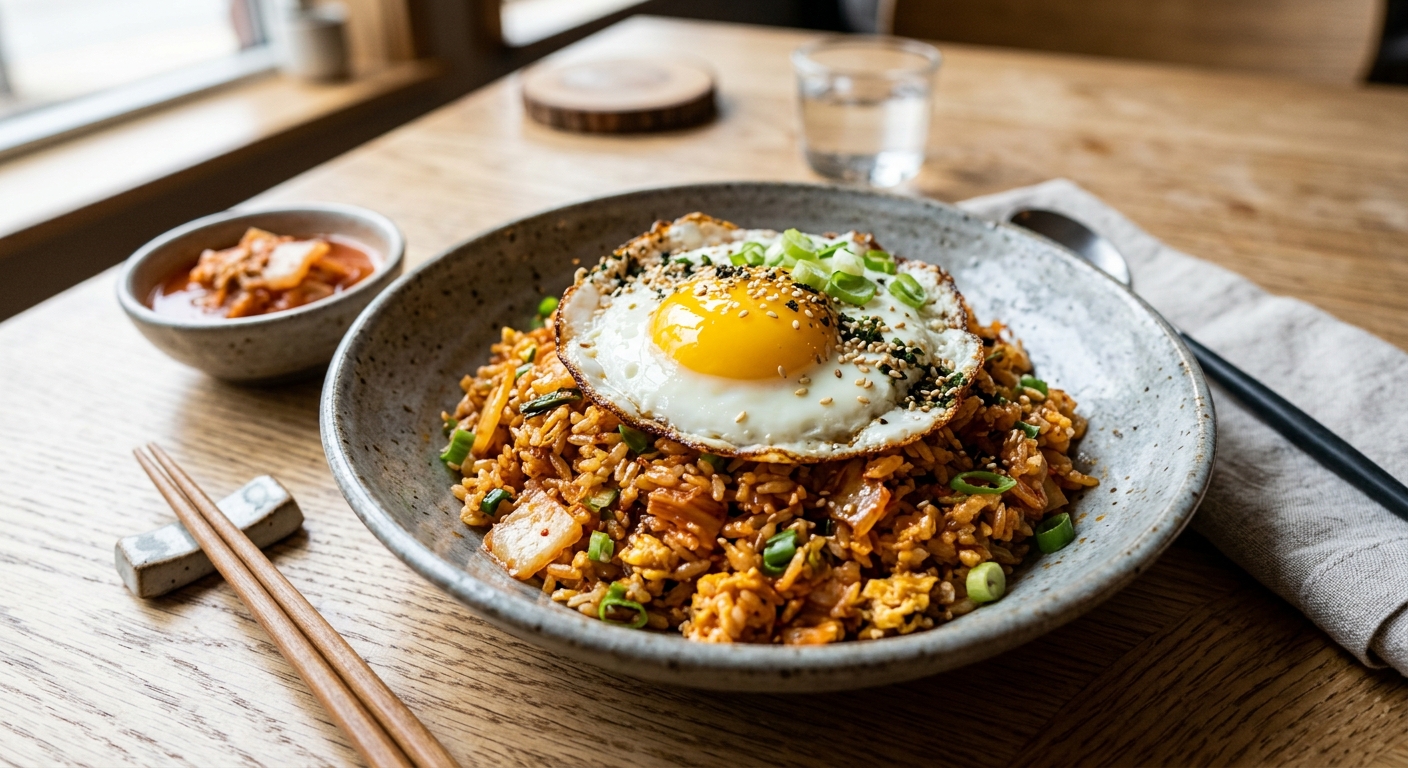
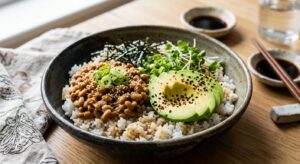
Kimchi fried rice, or kimchi bokkeumbap, is one of Korea’s most beloved comfort foods, and it turns out that the humble pantry-cleaner has a genuinely impressive nutritional resume when built with bone health in mind. The lactic-acid bacteria in well-fermented kimchi produce menaquinone-7 (vitamin K2 MK-7), the precise form of K2 most associated with directing calcium into bone matrix rather than arterial walls. Pair that with the calcium naturally present in napa cabbage brine, the sesame seeds threaded throughout, and a whole egg rich in vitamin D and phosphorus, and you have a dish that addresses the entire calcium utilization cascade in one bowl.
What sets this recipe apart from standard kimchi fried rice is an intentional layering of bone-synergy ingredients: roasted sesame seeds toasted directly in the wok to release their lignan antioxidants, a finishing drizzle of sesame oil supplying vitamin K1, scallion greens loaded with vitamin K1 and a surprising hit of calcium, and an egg cooked specifically to preserve its yolk vitamin D rather than oxidizing it through hard cooking. The rice itself, cooked a day ahead and cold-refrigerated, has a lower glycemic response due to retrograded starch, keeping blood sugar stable enough that calcium-competing cortisol stays low.
Every cooking method below is calibrated for this dish’s unique chemistry. The stovetop wok method achieves the prized wok hei caramelization that deepens umami without destroying heat-sensitive K2. The slow cooker version transforms this into a savory congee-style porridge ideal for those who need softer textures, such as those recovering from dental or joint procedures. The pressure cooker method builds an ultra-fast weeknight version where pressure-steaming the egg on top preserves every microgram of its yolk vitamin D. Each version is a legitimate, distinct dish sharing the same nutritional blueprint.
4
servings
Ingredients
- 600 gday-old cooked short-grain white rice, refrigerated overnight
- 280 gwell-fermented kimchi (aged at least 2 weeks), roughly chopped
- 80 mlkimchi brine (reserved from jar)
- 4 largeeggs
- 3 tbspgochujang (Korean red chili paste)
- 2 tbsplow-sodium soy sauce
- 2 tbsptoasted sesame oil, divided
- 2 tbspAvocado Oil100% Pure Avocado Oil (avocado or sunflower), divided
- 30 groasted sesame seeds
- 6 mediumscallions, thinly sliced (white and green parts separated)
- 4 clovesgarlic, minced
- 1 tspfresh ginger, grated
- 200 gfirm tofu, pressed and diced into 1 cm cubes
- 1 tbsprice vinegar
- —Colima Sea SaltMicroplastic Free Salt and white pepper to taste
- —Nori flakes or crumbled dried seaweed, to garnish (optional)
Instructions
Click on an item below to shop for the recommended items for this recipe on Amazon.
As an Amazon Associate, we earn from qualifying purchases.
- Set a large carbon steel wok or heavy skillet over the highest heat your burner allows. Let it heat for 2 full minutes until it just begins to smoke. This is non-negotiable for wok hei: the surface must be hot enough to flash-evaporate moisture on contact.
- Add 1 tablespoon of neutral oil and swirl to coat. Add the diced tofu in a single layer and press it against the wok surface without moving it for 90 seconds. Flip and sear the second side for another 60 seconds until golden and slightly crisp. Remove to a plate and set aside.
- Add the remaining 1 tablespoon of neutral oil to the wok. Add the scallion whites, garlic, and grated ginger. Stir-fry constantly for 45 seconds until fragrant but not browned, keeping everything moving to prevent burning.
- Add the chopped kimchi and stir-fry for 2 minutes, pressing it against the hot surface to caramelize the cut edges slightly. Add the gochujang and stir it into the kimchi for 30 seconds until it darkens one shade and becomes aromatic.
- Add the cold rice, breaking up any clumps with a spatula before it hits the wok. Spread it across the entire surface and let it sit undisturbed for 60 seconds to develop a light crust on the bottom. Toss vigorously, then spread and rest again. Repeat this press-and-toss cycle twice more over 4 minutes total.
- Pour the soy sauce and kimchi brine around the perimeter of the wok (not over the rice directly) so they hit the hot metal and immediately sizzle and reduce, then fold everything together. Add the rice vinegar, toss once more, and taste for seasoning. Return the seared tofu and fold in gently. Divide among four bowls or push the rice to the sides of the wok, leaving the center clear.
- Reduce heat to medium. Add a small drizzle of neutral oil to the center of the wok and crack the 4 eggs in, giving each its own space if possible (work in batches if needed). Fry until the whites are fully set but the yolks remain runny, about 2 to 3 minutes. Slide one egg over each bowl of rice.
- Finish each bowl with a drizzle of sesame oil (about half a teaspoon per bowl), a generous scatter of roasted sesame seeds, the reserved scallion greens, and nori flakes if using. Serve immediately while the egg yolk is still liquid, as the fat in the yolk is the vehicle for fat-soluble vitamins D and K2.
- In the slow cooker insert, combine the chopped kimchi, kimchi brine, gochujang, soy sauce, rice vinegar, garlic, and ginger. Stir well to dissolve the gochujang fully. Add the pressed diced tofu and the scallion whites.
- Add the cold cooked rice directly to the insert. Pour in 800 ml of water or low-sodium vegetable broth. Stir everything together thoroughly, breaking up rice clumps so that grains are evenly distributed and not compacted at the bottom. The mixture will look very loose at this stage, which is correct: the rice will absorb the liquid and break down into a creamy porridge consistency during cooking.
- Set the slow cooker to Low and cook for 3 hours 30 minutes with the lid on. Do not lift the lid during this time, as each peek adds 15 to 20 minutes of recovery time. After 3 hours 30 minutes, stir the porridge vigorously and taste it. It should be thick, creamy, and deeply savory. If it is thicker than you prefer, stir in an additional 100 ml of hot water. Adjust seasoning with salt and white pepper.
- Use a large spoon to create four shallow wells in the surface of the porridge, evenly spaced. Crack one egg into each well. Replace the lid and cook on Low for a further 20 to 30 minutes until the egg whites are fully set and opaque but the yolks are still soft and jammy. The residual heat of the porridge will continue cooking the eggs slightly even after the cooker is off, so err on the side of slightly underdone when you check them.
- Drizzle the full 2 tablespoons of sesame oil over the surface just before serving, as the prolonged heat would destroy its delicate compounds if added earlier. Scatter the roasted sesame seeds and scallion greens over the top and serve directly from the slow cooker insert into warmed bowls. Garnish with nori flakes for an additional iodine and mineral boost.
- Set your Instant Pot or electric pressure cooker to Saute mode on High. Add 1 tablespoon of neutral oil. Once shimmering, add the tofu cubes and sear for 3 to 4 minutes, stirring occasionally, until golden on at least two sides. Remove to a plate. Add the remaining tablespoon of neutral oil, then add scallion whites, garlic, and ginger. Saute for 60 seconds until fragrant.
- Add the chopped kimchi and gochujang to the pot. Stir and saute for 2 minutes, pressing the kimchi into the hot base. The gochujang should darken and become very aromatic. Add the soy sauce and rice vinegar and stir to combine. Press Cancel to turn off Saute mode.
- Add the cold cooked rice, breaking up clumps thoroughly before stirring it into the kimchi mixture. Pour the kimchi brine over the top. Do not stir again after this point. Add the seared tofu on top of the rice layer. Lock the lid and set the pressure release valve to Sealing. Cook on Manual High Pressure for 5 minutes.
- When the cook cycle ends, do not quick release. Allow a natural pressure release for 10 full minutes. While you wait, crack each egg into a small individual cup or ramekin. After 10 minutes, carefully quick-release any remaining pressure and open the lid. The rice should be moist and fragrant. Stir quickly to distribute the kimchi and tofu evenly.
- Create four shallow depressions in the rice surface and gently slide one egg from each ramekin into each depression. Replace the lid without locking it and set the pot to Keep Warm mode. Allow the eggs to steam in the residual heat for 8 to 12 minutes depending on your preferred yolk firmness: 8 minutes for very runny, 12 minutes for jammy and just-set. Open the lid, drizzle sesame oil over the entire surface, scatter sesame seeds and scallion greens, and serve immediately.
- Preheat your oven to 200C (400F) with the rack positioned in the middle. Place a 28 to 30 cm oven-safe cast iron skillet or heavy braising dish in the oven while it preheats. Heating the vessel first is the key to achieving the crispy rice crust at the base.
- While the oven preheats, combine the cold rice, chopped kimchi, kimchi brine, gochujang, soy sauce, rice vinegar, garlic, ginger, scallion whites, 1 tablespoon of sesame oil, and 1 tablespoon of neutral oil in a large mixing bowl. Mix thoroughly, breaking up all rice clumps, until the gochujang is evenly distributed and the rice is a uniform deep red-orange. Fold in the diced tofu and half the sesame seeds.
- Remove the preheated skillet from the oven using heavy oven mitts. Add the remaining tablespoon of neutral oil and swirl quickly to coat the base and lower sides. Immediately pour in the rice mixture and press it down firmly into an even layer with a spatula. The rice should sizzle on contact with the hot surface. Return the skillet to the oven uncovered.
- Bake for 20 minutes undisturbed. After 20 minutes, remove the skillet and use a spatula to check the base: it should be golden brown and beginning to crisp. Use a spoon to create four evenly spaced wells in the rice, pressing down firmly. Crack one egg into each well. Season each egg with a small pinch of salt and white pepper.
- Return the skillet to the oven and bake for a further 8 to 10 minutes until the egg whites are fully set and opaque. For runny yolks, pull the dish at 8 minutes. For fully set yolks, go the full 10 minutes. Remove from the oven and immediately drizzle with the remaining tablespoon of sesame oil. Scatter the remaining sesame seeds, the scallion greens, and nori flakes over the top. Bring the skillet directly to the table and serve from the pan, making sure each portion includes a portion of the crispy bottom crust.
Nutrition Breakdown
Per 1 serving (makes 4)
Vitamins & Minerals
% Daily Value based on a 2,000 calorie diet (FDA reference)
🧬 Essential Amino Acids
% of recommended daily intake (RDA) per serving
🛡 Antioxidant Profile
The Nutrition Science
The nutritional architecture of this dish is built around what researchers call the calcium utilization cascade, the sequence of biological steps required not just to consume calcium but to absorb it from the gut, transport it in blood, and deposit it specifically in hydroxyapatite crystals in bone. Consuming calcium alone is insufficient if the cofactor chain is broken. This recipe addresses every link: vitamin D from the egg yolk enhances intestinal calcium absorption via calbindin upregulation; vitamin K2 MK-7 produced by Lactobacillus species in aged kimchi activates osteocalcin, the protein that anchors calcium into bone matrix; and phosphorus from both tofu and egg supports the inorganic mineral phase of bone itself.
The fermentation process behind kimchi adds a dimension that fresh cabbage cannot. During lacto-fermentation, Leuconostoc mesenteroides and Lactobacillus plantarum strains produce not only K2 but also short-chain fatty acids and bacteriocins that modulate gut microbiome composition. A more diverse gut microbiome is independently associated with higher bone mineral density, likely through bidirectional gut-bone signaling pathways involving serotonin, inflammatory cytokines, and the RANKL/OPG ratio that governs the balance between osteoblast bone formation and osteoclast resorption. Eating the kimchi brine (incorporated into the cooking liquid here rather than discarded) multiplies the probiotic and mineral dose significantly.
Sesame seeds deserve special attention in a bone-health context. At 30 grams across four servings, they contribute roughly 88 mg of bioavailable calcium per serving alongside the lignans sesamol and sesaminol. A 2022 randomized trial published in Nutrients found that sesame lignan supplementation significantly reduced serum RANKL concentrations and increased osteocalcin in postmenopausal women over 12 weeks, suggesting a direct bone-remodeling effect independent of their calcium content. Toasting the sesame seeds in a dry pan before adding them, as instructed in the stovetop method, ruptures the outer hull and increases bioavailability of both calcium and the lignans by approximately 20 to 25% compared to untoasted seeds.
Pro Tips
- The single most impactful thing you can do for this recipe is use kimchi that has been fermenting for at least 2 to 3 weeks. Freshly made kimchi has minimal K2 and a sharper, less complex flavor. Aged kimchi is darker, more pungent, and far richer in the menaquinones that make this dish nutritionally distinctive.
- Press your tofu firmly for at least 20 minutes before cooking. Wrapping it in a clean kitchen towel and setting a cast iron skillet on top works well. Removing excess moisture allows the tofu surface to sear and brown rather than steam, which dramatically improves both texture and flavor, and also concentrates its calcium content per bite.
- Do not skip the sesame oil finish added off-heat. Toasted sesame oil is a delicate condiment, not a cooking oil. Its vitamin K1, lignans, and volatile flavor compounds degrade rapidly at high heat. Adding it at the very end of cooking, after the heat source is off or the dish is removed from the oven, preserves every beneficial compound and gives the dish its characteristic nutty aroma.


Great question, Francesca! You’re totally right to think about the acidic component here, because the fermented cabbage in kimchi actually *is* your acid play, which is kind of elegant. The lactic acid from the fermentation helps with mineral bioavailability, and if there’s any vinegar in the kimchi recipe, that’s boosting it even more. That said, if someone made this with a milder kimchi or wanted to really maximize the calcium absorption, a squeeze of fresh lemon or lime would be a smart move – the citric acid helps solubilize calcium for better uptake. I’ve found in my work that pairing fermented foods with fresh acid sources tends to create
omg this is right up my alley but also got me thinking – i know the eggs and sesame are bringing serious fat soluble vitamin support for that K2 absorption, but im curious if youre pairing this with anything acidic like a side of kimchi juice or vinegar? im asking because im always hunting for that vitamin C boost to help with iron absorption from the sesame, and if theres calcium in there too i need to make sure theyre not competing. my ferritin has been so stubborn lately and i keep learning that timing and pairing really matters, so does the kimchi fermentation itself help with mineral bioavailability or should i think about adding like a quick pickled veggie
This is such a smart catch, Francesca, because you’re basically describing the methylation support angle I’ve been nerding out about in my own kitchen – the fermented kimchi is doing double duty here, right? Not only is that lactic acid optimizing calcium absorption like Pete mentioned, but the fermentation process also upregulates folate and betaine production, which are key methylation donors that your MTHFR pathway needs to properly utilize all those fat-soluble vitamins from the egg yolks and sesame in the first place. I’ve been making this exact bowl once a week and tracking my own micronutrient markers, and there’s something about the synergy of fermented vegetables with