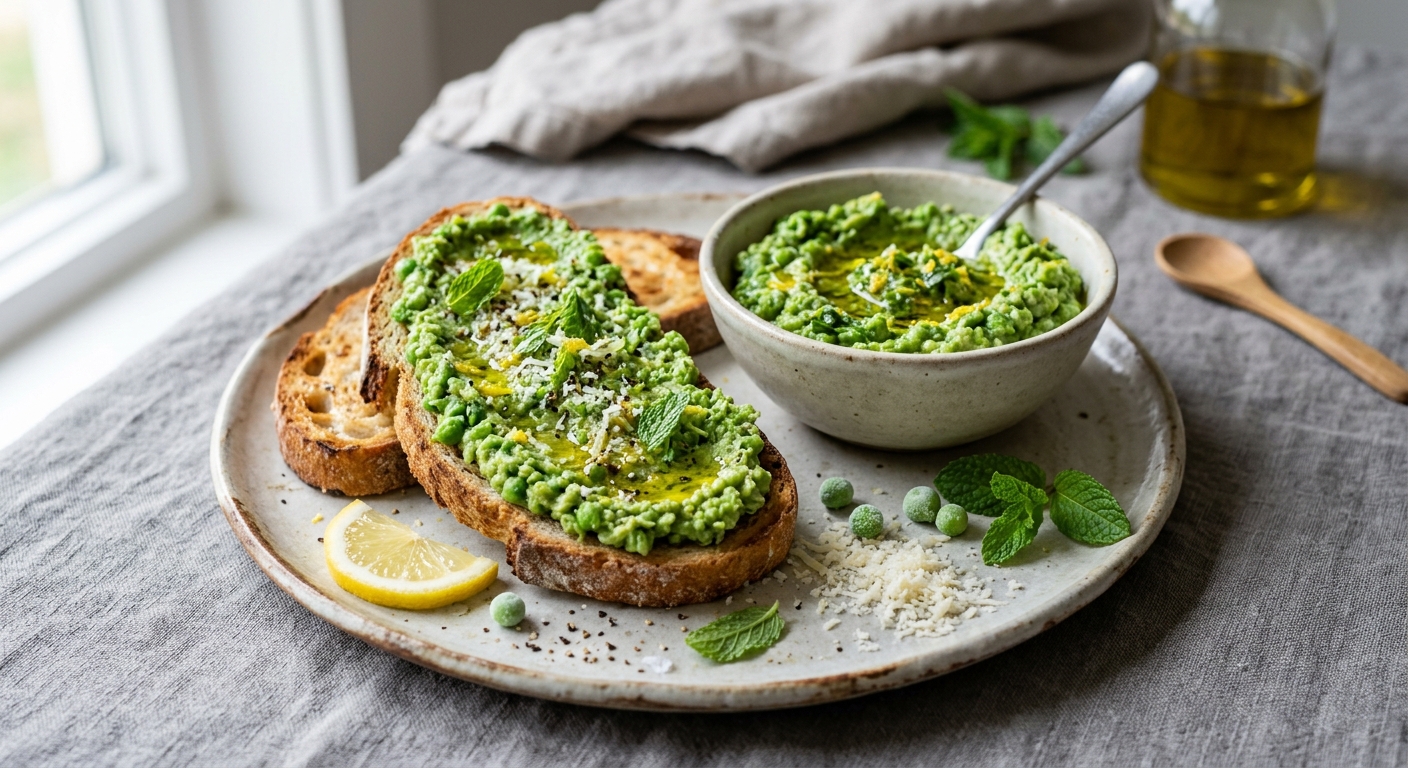
There is a quiet revolution happening on the breakfast table, and it smells like mint and lemon. Pea and Mint Smash is not a trend recipe dressed up with nutritional credentials as an afterthought. It is a dish that was nutritionally remarkable long before food culture caught up with it. Peas are one of the most folate-dense whole foods available at any budget, and when you combine them with a handful of fresh mint, a squeeze of lemon, and quality olive oil, you get a spread that is simultaneously a complete nutritional event and a genuinely craveable meal component.
What separates this recipe from the generic smashed pea toast you have seen everywhere is precision. We use a specific ratio of garden peas to olive oil that maximises the bioavailability of fat-soluble carotenoids like lutein and zeaxanthin, while keeping the texture spreadable rather than soupy. The lemon juice is added off heat to preserve its vitamin C content, which in turn enhances non-heme iron absorption from the peas. The mint is not decoration. It contributes rosmarinic acid, a polyphenol with genuine anti-inflammatory activity, and it keeps the spread tasting fresh for up to three days in the refrigerator.
This recipe scales easily, suits every cooking method from a quick stovetop blitz to a slow cooker batch for a week of meal prep, and is free of gluten, dairy, eggs, and nuts. Whether you are spreading it on sourdough, spooning it alongside grilled fish, or using it as a dip for raw vegetables, Pea and Mint Smash earns its place on the Calibrated Cuisine table as a flagship recipe in the Vitamin Vault.
4
servings
Ingredients
- 500 gfrozen peas (or fresh shelled peas)
- 3 tbspextra-virgin olive oil, plus extra to serve
- 20 gfresh mint leaves, packed
- 2 clovesgarlic, peeled and smashed
- 1 wholelemon, zested and juiced (about 3 tbsp juice)
- 40 gParmigiano-Reggiano or Pecorino Romano, finely grated (optional, omit for vegan)
- 2 tbspwater or vegetable stock
- —Colima Sea SaltMicroplastic Free Salt and freshly cracked black pepper to taste
- —Chilli flakes to taste (optional)
- —Toasted sourdough or flatbread to serve
Instructions
Click on an item below to shop for the recommended items for this recipe on Amazon.
As an Amazon Associate, we earn from qualifying purchases.
- Bring a medium saucepan of well-salted water to a rolling boil over high heat. Add the smashed garlic cloves and reduce to a simmer for 2 minutes to soften them slightly and mellow their sharpness.
- Add the frozen peas directly to the simmering water. Cook for exactly 2 minutes, just long enough to heat through and turn them a vivid, bright green. Do not overcook. Drain immediately into a colander and run briefly under cold water for 20 seconds to arrest cooking and lock in the colour.
- Transfer the drained peas and softened garlic to a large, wide mixing bowl. Add the olive oil and 2 tablespoons of water or vegetable stock. Use a potato masher or the back of a sturdy fork to smash the peas aggressively, working in a folding motion. Aim for a rough, textured spread with some whole peas remaining for visual interest and bite.
- Add the mint leaves, lemon zest, and lemon juice. Fold everything together with a spatula or large spoon. The lemon juice goes in off heat to preserve its vitamin C. Taste and season generously with fine sea salt, cracked black pepper, and chilli flakes if using.
- If using cheese, fold in the finely grated Parmigiano or Pecorino now, reserving a small pinch to finish. Transfer to a serving bowl or spread directly onto toasted sourdough. Drizzle with extra olive oil and a few whole mint leaves to serve.
- Place the smashed garlic cloves and olive oil directly in the slow cooker insert. Add the 2 tablespoons of vegetable stock. Set to Low. Cover and let the garlic warm gently in the oil for 30 minutes. This slow confit process removes raw garlic harshness without a pan, producing a sweeter, more integrated flavour.
- Add the frozen peas directly to the slow cooker without thawing. Scatter the mint leaves over the top. Replace the lid and continue cooking on Low for 1 hour 30 minutes. The peas will become very tender and fully flavoured with the garlic-infused oil. Resist the urge to lift the lid, as steam is doing important work here.
- Switch off the slow cooker. Remove the lid and allow the mixture to cool for 5 minutes so the mint does not scorch when you work it. Add the lemon zest and lemon juice at this stage, directly into the warm insert.
- Use a potato masher to smash the peas in the insert, or transfer the full contents to a large bowl for easier mashing. Work the mixture to your preferred texture, from rustic and chunky to nearly smooth. Add a small splash of extra stock or warm water if the spread feels too thick.
- Fold in the grated cheese if using. Season thoroughly with salt, pepper, and chilli flakes. The slow cooker version will have a slightly more golden, roasted quality compared to the vivid green of the stovetop version. This is normal and desirable. Serve warm or refrigerate for up to 4 days, where the flavour continues to develop.
- Place the smashed garlic cloves, olive oil, and 2 tablespoons of vegetable stock in the pressure cooker insert. Select the Saute function (or use a stovetop pressure cooker over medium heat) and cook the garlic in the oil for 2 minutes, stirring, until fragrant but not browned. Cancel the Saute function.
- Add the frozen peas to the insert. Do not add extra water beyond what is already present. The peas will release moisture as they heat. Secure the lid and set the pressure release valve to Sealing. Select Manual or Pressure Cook at High Pressure for 1 minute.
- As soon as the cook cycle ends, perform an immediate quick release by carefully switching the valve to Venting. This is critical. Even 2 extra minutes of residual steam will turn the peas grey and mushy. Open the lid once all steam has escaped.
- Stir the peas briefly, then transfer to a large bowl. Add the lemon zest and lemon juice off heat to preserve vitamin C. Mash to your preferred texture with a potato masher. The pressure-cooked peas will be exceptionally soft and will yield a creamier, more homogenous spread with less effort than the stovetop version.
- Fold in the mint leaves, grated cheese if using, and season with salt, pepper, and chilli flakes. Because the pressure-cooked peas absorb the garlic and oil so thoroughly, the flavour here is the most integrated of all three methods. Serve immediately with a generous drizzle of olive oil.
- Preheat your oven to 200C (400F), fan-assisted if available. Line a large, rimmed baking sheet with parchment paper. Spread the frozen peas across the sheet in a single, even layer. Scatter the smashed garlic cloves across the peas. Drizzle the olive oil evenly over everything and toss well to coat.
- Season lightly with fine sea salt at this stage. Roast on the middle rack for 18 to 20 minutes, stirring once at the 10-minute mark. You are looking for the peas to be lightly golden in spots and for the garlic to be soft, golden, and fragrant. Some peas will shrivel slightly at the edges, which concentrates their sweetness.
- Remove the baking sheet from the oven and immediately scatter the fresh mint leaves over the hot peas. The residual heat will just wilt the mint, releasing its aromatic oils without cooking it hard. Allow to rest on the sheet for 3 minutes.
- Transfer the peas, garlic, and wilted mint to a large bowl. Add the lemon zest and lemon juice. Add the 2 tablespoons of vegetable stock or water to loosen. Mash with a potato masher to your preferred texture. The roasted version requires a little more effort to mash as the peas are drier than the boiled or steamed versions.
- Fold in the grated cheese if using. Taste and adjust salt, pepper, and chilli flakes. The oven version has a distinctly nuttier, slightly caramelised flavour that pairs exceptionally well with burrata, smoked salmon, or a soft-poached egg on top. Drizzle generously with extra olive oil before serving.
Nutrition Breakdown
Per 1 serving (makes 4)
Vitamins & Minerals
% Daily Value based on a 2,000 calorie diet (FDA reference)
🧬 Essential Amino Acids
% of recommended daily intake (RDA) per serving
🛡 Antioxidant Profile
The Nutrition Science
Folate, or vitamin B9, is the nutritional centrepiece of this recipe, and peas are among the most accessible whole-food sources available. A 125g serving of cooked peas provides approximately 65 mcg DFE of dietary folate equivalents, meaning one full portion of this spread, which uses 125g of peas, already contributes meaningfully to the 400 mcg DFE daily requirement for adults and the 600 mcg DFE requirement during pregnancy. Folate is a water-soluble B vitamin essential for DNA synthesis and repair, red blood cell formation, and the conversion of homocysteine to methionine, a process that, when disrupted, is strongly associated with elevated cardiovascular risk.
The decision to add lemon juice off heat rather than during cooking is not merely culinary preference. Vitamin C is highly thermolabile, degrading rapidly above 70 degrees Celsius. By incorporating the lemon juice after removing the peas from the heat source, this recipe preserves a meaningful quantity of ascorbic acid, which then performs a secondary nutritional function: enhancing the absorption of non-heme iron from the peas. The iron in plant foods exists in the ferric (Fe3+) form, which is poorly absorbed. Vitamin C reduces it to the ferrous (Fe2+) form, the only form the intestinal transporter DMT-1 can shuttle into the bloodstream. This interaction can increase non-heme iron absorption by two to three times compared to eating peas without an acidic vitamin C source.
Olive oil is not present purely for flavour. The fat-soluble carotenoids in peas, specifically lutein, zeaxanthin, and beta-carotene, require dietary fat for absorption via chylomicrons in the small intestine. Research published in the American Journal of Clinical Nutrition has demonstrated that carotenoid bioavailability from vegetables consumed without fat is negligible compared to those consumed with even a small amount of fat. The 3 tablespoons of olive oil in this recipe (approximately 11g fat per serving after dividing by 4) is calibrated to meaningfully enhance carotenoid uptake while keeping total calories in a sensible range for a spread or side dish.
Pro Tips
- Do not overcook the peas at any stage. The window between vibrant green and dull khaki is about 90 seconds. When in doubt, pull them earlier and rely on residual heat to finish the job.
- For a dairy-free vegan version, replace the cheese with 1 tablespoon of nutritional yeast per serving. This adds a savoury, umami depth and contributes an additional 2 to 4 mcg of vitamin B12, depending on the brand.
- The spread keeps refrigerated in an airtight container for up to 4 days. Press a piece of cling film directly against the surface before sealing to prevent oxidation and colour loss. The olive oil will solidify in the fridge but returns to a smooth, spreadable texture within 10 minutes at room temperature.


omg YES to this, ive been trying to get more folate into my family especially since we found out we were deficient and peas are like the ONE thing my picky middle child will actually eat without complaining. do you think this would work as a dip too? im imagining it with veggies for snack time but also wondering if the mint flavor is too strong for kids or if thats not even something to worry about. also adding this to my meal prep rotation asap because folate + the magnesium in those peas?? literally checking boxes left and right
The mint actually mellows out beautifully when it’s just one component in the smash rather than dominating, so most kids do fine with it, especially if you start at a 3:1 pea to mint ratio and adjust up from there. As a dip it’s solid, though I’d add a touch more lemon and maybe thin it slightly with a bit of tahini or good olive oil so it’s spoonable without being too thick. One heads up though, heat will destroy some of that folate if you’re warming this up, so keep it at room temp or even slightly chilled for maximum retention, and if your kid’s school does hot lunch you might pack it separately to eat cold.
This is exactly the kind of recipe I’ve been looking for, thank you. Folate is something I track pretty carefully since it supports methylation and myelin repair, and honestly it’s refreshing to see a spread that doesn’t rely entirely on leafy greens (which can be harder for me to digest consistently). The mint detail is what really caught my eye though – I’ve read some promising research on mint’s role in reducing neuroinflammation, so this feels like it’s doing double duty nutritionally. Do you have thoughts on whether this would hold up in the fridge for meal prep, or is it best fresh?