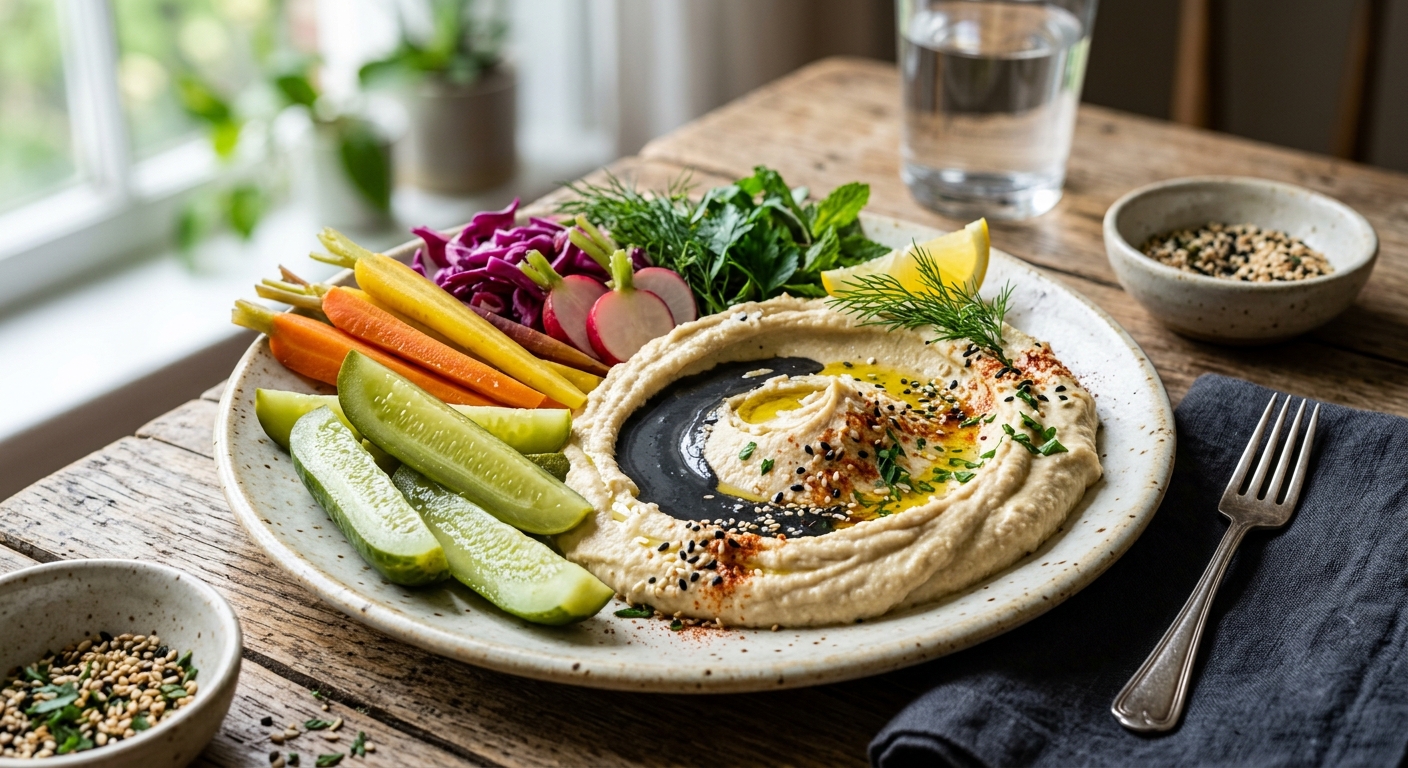
Fermentation is one of humanity’s oldest preservation techniques, but modern nutritional science has revealed just how profoundly it transforms food. When vegetables undergo lacto-fermentation, Lactobacillus bacteria consume sugars and produce lactic acid, which not only preserves the vegetables but increases bioavailability of minerals, synthesises B vitamins, and populates the finished product with billions of probiotic organisms. This pickle plate pairs four distinct fermented vegetables, each chosen for a specific micronutrient contribution, with a hummus that is deliberately formulated around white beans and black sesame tahini to push calcium, magnesium, and iron well above typical dip benchmarks.
The hummus here is not a standard chickpea blend. Cannellini beans are the base: they offer nearly 130mg of calcium per 100g cooked, roughly double that of chickpeas, and they blend into an exceptionally creamy, cloud-like texture that takes on roasted garlic and lemon beautifully. Black sesame tahini adds another layer of calcium and magnesium that is genuinely difficult to replicate with other ingredients. Together, this combination pushes a single serving past 40% of the Daily Value for calcium without a milligram of dairy in sight.
The cooking methods here apply specifically to the hummus component, since the fermented pickles are a room-temperature or refrigerator process that does not involve heat. Each method, stovetop simmering, slow-cooker braising, or pressure-cooking, produces beans with a subtly different texture and flavour profile that translates directly into the final hummus character. The pickle brine is made once and works across all methods. Plan the pickles at least 48 hours ahead for mild tang, or up to 5 days for a more assertive, deeply sour result.
4
servings
Ingredients
- 400 gdried cannellini beans, soaked overnight in cold water
- 90 gblack sesame tahini (or standard sesame tahini)
- 1 headgarlic, for roasting (plus 2 raw cloves for hummus)
- 60 mlextra-virgin olive oil, plus extra to finish
- 2 tbspfresh lemon juice
- 1 tspground cumin
- 0.5 tspsmoked paprika
- 300 gPersian cucumbers (about 4 small), quartered lengthwise
- 2 mediumcarrots, peeled and cut into sticks
- 200 gred cabbage, cut into 3cm wedges
- 150 gred radishes, halved
- 1 litrefiltered water
- 20 gfine non-iodised Colima Sea SaltMicroplastic Free Salt (for brine, approx. 2% solution)
- 1 tbspwhole black peppercorns
- 1 tbspcoriander seeds
- 4 sprigsfresh dill
- 6 clovesgarlic, lightly crushed (for pickle jars)
- 1 tspchilli flakes
- 60 mlaquafaba (reserved cooking liquid from beans)
- —Colima Sea SaltMicroplastic Free Salt and white pepper to taste
Instructions
Click on an item below to shop for the recommended items for this recipe on Amazon.
As an Amazon Associate, we earn from qualifying purchases.
- PICKLES (prepare 48 to 120 hours ahead): Dissolve 20g non-iodised sea salt in 1 litre of room-temperature filtered water to create a 2% brine. Do not use iodised salt as iodine inhibits fermentation. Stir until fully dissolved, then set aside.
- Prepare four clean 500ml wide-mouth glass jars. Divide the black peppercorns, coriander seeds, dill sprigs, chilli flakes, and crushed garlic cloves evenly among the jars. Pack the cucumber spears tightly into one jar, carrot sticks into another, red cabbage wedges into a third, and halved radishes into the fourth. Pack firmly so the vegetables cannot float above the brine.
- Pour the salt brine over each jar, ensuring all vegetables are fully submerged. If necessary, wedge a small piece of vegetable or a zip-lock bag filled with brine crosswise at the mouth of the jar to keep everything below the liquid. Loosely cap each jar (do not seal airtight, as CO2 must escape) and leave at room temperature, ideally 18 to 22 degrees Celsius, out of direct sunlight. After 48 hours, taste for tang. Continue fermenting up to 5 days for deeper flavour, tasting daily. Once at your preferred sourness, seal tightly and refrigerate.
- ROASTED GARLIC (day of serving): Preheat your oven to 200 degrees Celsius. Slice the top off a whole head of garlic to expose the cloves, drizzle with 1 teaspoon of olive oil, wrap in foil, and roast for 35 to 40 minutes until golden and completely soft. Squeeze out the cloves and reserve.
- STOVETOP BEANS: Drain and rinse the overnight-soaked cannellini beans. Place them in a large saucepan and cover with fresh cold water by at least 5cm. Bring to a vigorous boil over high heat and boil for 10 minutes (this is especially important for beans to neutralise lectins). Skim any foam, then reduce heat to a steady gentle simmer. Cook uncovered for 50 to 65 minutes, until a bean pressed between your fingers offers no resistance and the interior is completely smooth and creamy, not chalky. Do not add salt during cooking as it can toughen the skins.
- Reserve 120ml of the starchy cooking liquid (aquafaba) before draining. Drain the beans and spread on a tray for 5 minutes to let surface moisture evaporate slightly. This prevents the hummus from becoming watery.
- HUMMUS ASSEMBLY: While the beans are still warm (warm beans blend significantly smoother than cold), add them to a high-powered food processor or blender along with the tahini, roasted garlic cloves, 2 raw garlic cloves, lemon juice, cumin, olive oil, and 60ml of the reserved aquafaba. Process for a full 4 minutes, scraping down the sides every 60 seconds. The extended processing time is essential: it breaks down the bean cell walls for a hummus that is genuinely silky rather than grainy. Add additional aquafaba one tablespoon at a time if needed to reach a flowing, ribbon-like consistency. Season generously with fine sea salt and white pepper.
- TO SERVE: Spread the hummus in a wide, shallow bowl using the back of a spoon to create a swirl and a shallow well in the centre. Drizzle with extra-virgin olive oil, dust lightly with smoked paprika, and arrange the four fermented pickle varieties around the hummus or on a separate wooden board alongside. Serve immediately or refrigerate hummus for up to 4 days.
- PICKLES: Follow the exact pickle fermentation steps from the Stovetop method (steps 1 through 3), beginning 48 to 120 hours before you plan to serve. The slow cooker only affects the bean and hummus preparation.
- SLOW COOKER BEANS: Drain and rinse the overnight-soaked cannellini beans. Unlike the stovetop method, you must parboil the beans first even for the slow cooker: place the drained beans in a saucepan, cover with cold water, bring to a full rolling boil, and boil hard for 10 minutes. Drain and discard this water. This step is non-negotiable for food safety with kidney-family beans and it also removes compounds that can cause digestive discomfort.
- Transfer the parboiled beans to the slow cooker insert. Add enough fresh cold water to cover by 4cm, approximately 1.2 litres. Do not add salt, acid, or tomatoes at this stage as they prevent the beans from softening properly in a slow cooker environment. Cover and cook on Low for 7 to 8 hours. The beans are done when they are completely tender with no chalky centre and are beginning to look slightly plump and pillowy. If cooking on High, reduce time to 3.5 to 4 hours, though Low yields a superior texture for hummus purposes.
- ROASTED GARLIC: About 45 minutes before the beans finish, prepare the roasted garlic: slice the top off the garlic head, drizzle with olive oil, wrap in foil, and place in a conventional oven at 200 degrees Celsius for 35 to 40 minutes. Alternatively, if you have a second oven-safe vessel, you can prepare a smaller roasted garlic batch in a toaster oven while the slow cooker runs.
- When the beans are done, use a ladle to transfer 120ml of the cooking liquid to a small bowl and reserve as aquafaba. Do not drain the beans into a colander immediately: instead, let them rest in the switched-off slow cooker with the lid slightly ajar for 15 minutes. This gradual temperature drop helps the beans hold their shape during transfer and keeps them warmer for blending, which produces a smoother hummus.
- HUMMUS ASSEMBLY AND SERVING: Transfer the warm, drained beans to a high-powered food processor. Add the tahini, all roasted garlic, 2 raw garlic cloves, lemon juice, cumin, and olive oil. Process for 4 full minutes, adding the reserved aquafaba gradually through the feed tube during the first 2 minutes. The slow-cooker beans will have absorbed more water than stovetop beans and may need slightly less aquafaba to reach the correct consistency. Taste carefully and adjust salt, lemon, and cumin. Plate and garnish as described in the Stovetop method, serving the full fermented pickle plate alongside.
- PICKLES: Prepare the fermented pickles 48 to 120 hours in advance using the same brine, spice, and fermentation instructions detailed in the Stovetop method steps 1 through 3. The pressure cooker method applies only to the bean and hummus preparation.
- ROASTED GARLIC (prepare first, since the pressure cooker is faster): Before starting the beans, roast the garlic head. Slice the top off the head to expose the cloves, drizzle with 1 teaspoon olive oil, and wrap in foil. Roast in a conventional oven at 200 degrees Celsius for 35 to 40 minutes. This can run while you prep the beans. Once golden and soft, squeeze out the cloves and set aside.
- PRESSURE COOKER BEANS: Unlike the stovetop method, the pressure cooker allows you to skip the parboil step if the beans have been soaked overnight, though you can do a quick parboil if preferred. Drain and rinse the soaked cannellini beans and place them directly in the pressure cooker insert. Add 1.2 litres of fresh cold water. Do not fill above the two-thirds maximum fill line. Do not add salt, lemon, or any acidic ingredient before pressure cooking, as acid prevents beans from softening under pressure. Add 1 tablespoon of neutral oil to the water to minimise foaming, which can clog the pressure valve.
- Seal the lid and set to High Pressure. Cook for 25 minutes (for beans soaked overnight) or 35 minutes (for beans not soaked). Allow a natural pressure release for 15 minutes before manually releasing any remaining pressure. Do not use a quick-release immediately, as the rapid depressurisation can cause the beans to burst and cloud the cooking liquid excessively.
- Open the lid and check bean texture: they should be completely soft and slightly swollen. Use a ladle to carefully scoop out 120ml of the thick, starchy cooking liquid into a small bowl. This pressure-cooker aquafaba is considerably more concentrated than stovetop liquid and will produce a notably creamier hummus. Drain the remaining liquid and spread the beans on a tray for 3 minutes to release surface steam.
- HUMMUS ASSEMBLY: Add the still-warm beans to a high-powered food processor. Add the tahini, roasted garlic, 2 raw garlic cloves, lemon juice, cumin, and olive oil. Begin processing, and with the motor running, pour in the concentrated aquafaba in a steady stream. Because pressure-cooker aquafaba is denser, start with 40ml and add more only if the hummus is too thick to flow smoothly. Process for a full 4 minutes for maximum silkiness. The pressure-cooker hummus will have a slightly more glossy, almost resinous texture compared to the stovetop version. Season with sea salt and white pepper, then plate with the fermented pickle plate as described in the Stovetop method.
- PICKLES: Prepare the fermented pickles 48 to 120 hours in advance using the brine and fermentation method described in the Stovetop instructions, steps 1 through 3.
- ROASTED GARLIC: Set the oven to 200 degrees Celsius. Slice the top off the garlic head to expose the cloves, drizzle with 1 teaspoon olive oil, wrap in foil, and place directly on the oven rack. Roast for 35 to 40 minutes until golden and completely soft. Remove and set aside. Reduce oven temperature to 150 degrees Celsius for the beans.
- OVEN BEANS: Drain and rinse the overnight-soaked cannellini beans. Place them in a large Dutch oven or heavy oven-safe pot with a tight-fitting lid. Cover with 1.4 litres of fresh cold water. The higher water ratio than stovetop is important here because some moisture will evaporate through the lid seal and the oven environment is drier than a stovetop simmer. Do not salt the water at this stage.
- Place the uncovered Dutch oven on the stovetop over high heat and bring the water to a full boil. Boil vigorously for 10 minutes, skimming any foam that rises. This stovetop boil phase is essential for lectin neutralisation and cannot be replaced by oven heat alone, as the oven temperature is deliberately below a full rolling boil. Skim well, then place the lid firmly on the Dutch oven.
- Transfer the covered Dutch oven to the 150-degree Celsius oven. Bake for 1 hour 45 minutes to 2 hours. Do not open the lid for the first 90 minutes, as the trapped steam environment is what cooks the beans evenly. After 90 minutes, carefully lift the lid away from you (the steam is intensely hot), and check one bean for doneness: it should be completely soft and creamy throughout. If still slightly firm, re-cover and continue for 15-minute intervals.
- Remove from the oven. Ladle out 120ml of the cooking liquid (aquafaba) and reserve. The oven-braised liquid will be slightly more opaque and flavourful than stovetop liquid. Allow the beans to cool for 10 minutes in the pot before draining. The oven method tends to leave a light golden crust on the beans that contact the pot walls: these caramelised pieces are flavour gold and should be scraped into the food processor along with the rest.
- HUMMUS ASSEMBLY AND SERVING: While beans are still warm, transfer to a food processor with the tahini, roasted garlic, 2 raw garlic cloves, lemon juice, cumin, and olive oil. Process for 4 minutes, adding aquafaba as needed. The oven-braised hummus will have a distinctly deeper, nuttier flavour profile compared to the other methods. You may find it needs a touch more lemon juice to balance the caramelised sweetness. Plate generously, garnish with olive oil and smoked paprika, and serve with the fermented pickle plate.
Nutrition Breakdown
Per 1 serving (makes 4)
Vitamins & Minerals
% Daily Value based on a 2,000 calorie diet (FDA reference)
🧬 Essential Amino Acids
% of recommended daily intake (RDA) per serving
🛡 Antioxidant Profile
The Nutrition Science
The combination of lacto-fermented vegetables and mineral-dense white bean hummus is not incidental. Lacto-fermentation by Lactobacillus species produces lactic acid, which lowers the pH of both the brine and the vegetables themselves. This acidic environment breaks down phytate, the primary anti-nutrient in legumes and seeds that binds minerals like iron, calcium, and zinc and prevents their absorption. Research published in the Journal of Food Science has demonstrated that lacto-fermentation can reduce phytate content by 30 to 50%, meaningfully increasing the bioaccessibility of the very minerals we are targeting in this recipe. Serving fermented vegetables alongside the hummus means that residual lactic acid ingested with the meal may extend this mineral-liberating effect during digestion.
Black sesame tahini is the nutritional centrepiece of this hummus formulation. Black sesame seeds retain their hull, which is where the majority of calcium (approximately 975mg per 100g of whole black sesame), iron, and magnesium are concentrated. Standard hulled tahini loses a substantial proportion of this mineral content during processing. The lignans sesamin and sesamolin present in sesame are also of significant scientific interest: they act as phytoestrogen precursors converted by gut microbiota into enterolactone and enterodiol, compounds associated with reduced risk of hormone-sensitive cancers in observational studies. The fat matrix of tahini (primarily unsaturated oleic and linoleic acids) further enhances the absorption of fat-soluble antioxidants from the accompanying fermented red cabbage and carrots.
Red cabbage deserves particular attention in the context of anti-inflammatory eating. Its deep purple pigment comes from a class of flavonoids called anthocyanins, specifically cyanidin-3-glucoside and cyanidin-3-sophoroside-5-glucoside. In vitro and animal studies have shown these compounds inhibit NF-kappaB, a master regulator of the inflammatory cascade, at concentrations achievable through dietary intake. Importantly, lacto-fermentation of red cabbage has been shown to increase total anthocyanin bioavailability compared to raw or cooked cabbage, because the acidic brine environment stabilises the anthocyanin structure and the fermentation process may partially break down the cell wall matrix that traps these compounds. This makes the fermented red cabbage in this recipe arguably the most bioavailable form of these anti-inflammatory pigments you can consume.
Pro Tips
- Always use non-iodised salt for fermentation. Iodine is added to table salt as a public health measure, but it is also a broad-spectrum antimicrobial that will suppress or kill the Lactobacillus cultures you need for a successful ferment. Look for pure sea salt, kosher salt, or pickling salt with no additives.
- The ratio of blending time to hummus quality is almost linear up to about 5 minutes. Most home cooks stop at 60 to 90 seconds. Pushing to a full 4 minutes breaks down more of the bean’s cell structure and fully emulsifies the tahini oil into the bean starch, producing a dramatically smoother result. A food processor works better than a blender for this because it can handle a thicker paste without overheating.
- Fermenting the four vegetable types in separate jars is intentional: different vegetables harbour different native microbial communities and ferment at slightly different rates. Red cabbage is typically the fastest (ready in 48 hours), while carrot sticks are slowest (often benefiting from a full 5 days). Keeping them separate lets you pull each variety at its flavour peak rather than compromising all four to a single timeline.


This is such a beautiful approach to mineral bioavailability, especially pairing fermented vegetables with tahini hummus. The lacto-fermentation really does prime the gut to absorb those minerals more effectively, and I love that you’re thinking about calcium density beyond dairy. I’ve been weaving similar logic into my golden milk teachings, where the black pepper alongside turmeric isn’t just about curcumin absorption, but about how we prepare the whole digestive system to actually use what we’re eating. Do you find your clients respond differently to minerals presented this way, through whole food synergy rather than isolated supplements?
This is exactly the kind of mineral density work I’ve been curious about, especially for recovery days when I’m not hammering carbs. Quick question though: what’s your take on timing this plate relative to training? I’m wondering if the fermented veg and tahini work better as a post-ride recovery tool (gut healing, mineral replenishment) versus something I’d load pre-ride when I need more glycogen. My typical recovery window is pretty carb-focused, so I’m trying to figure out whether the white beans here are hitting enough carbs or if this is more of a nutrient-dense off-day plate for me. Either way, the bioavailability angle with fermentation plus tahini
oh i love this question because ive definitely experimented with both timing windows! honestly for me the white beans plus tahini combo is solid for recovery but youre right that its not gonna be your primary carb refuel – id think of it more as that mineral and gut-healing anchor alongside your main recovery carbs rather than replacing them. like, id still want rice or toast or fruit as my base post-ride, then add this plate because the fermentation and magnesium really do help with inflammation and glycogen resynthesis isnt just about calories, its about recovery environment, you know? that said, ive found it perfect for easy/off-days when im not chasing glycogen aggressively – those