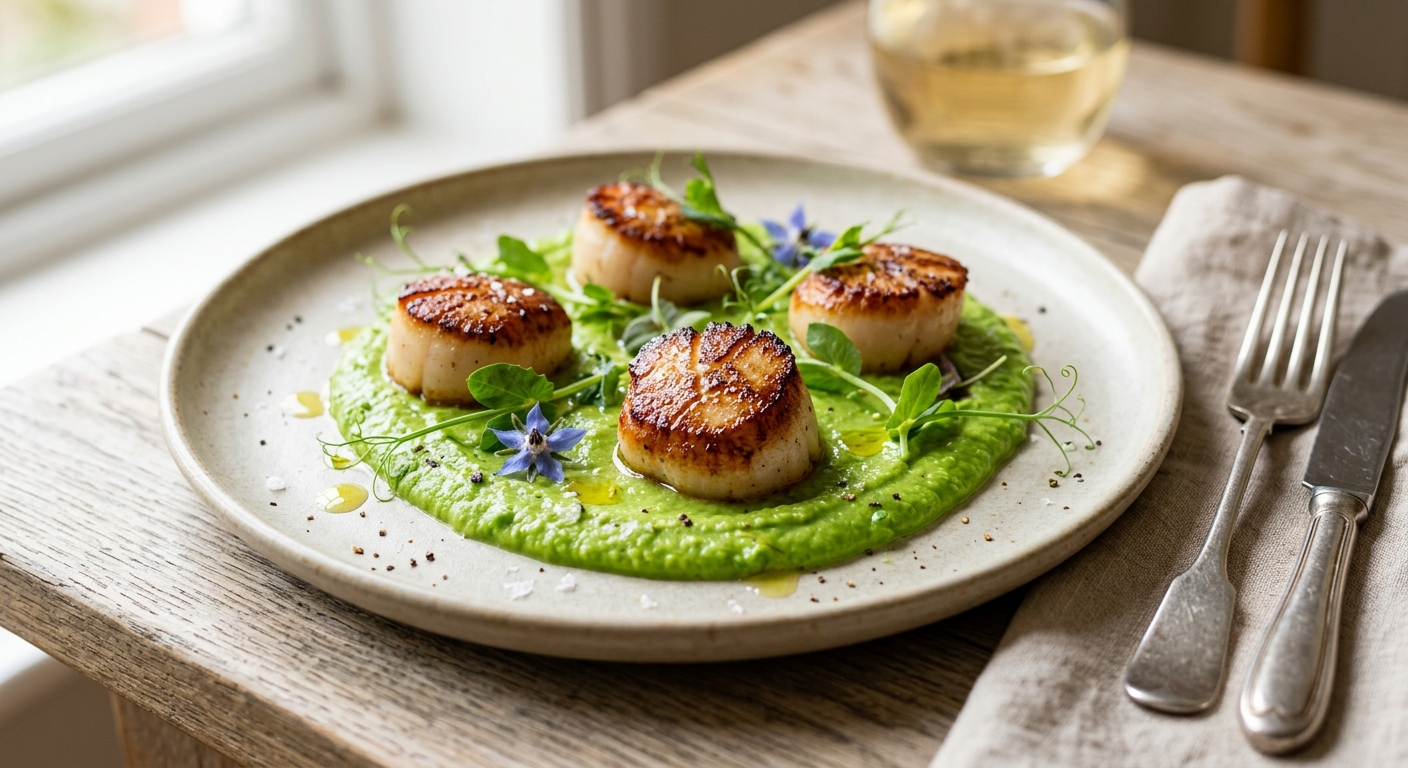
There is a reason seared scallops appear on the menus of the world’s finest restaurants: few ingredients achieve such dramatic contrast between textures and flavors with so little interference. A dry-packed sea scallop, kissed by a scorching-hot cast iron pan, develops a caramelized crust in under two minutes while the interior stays custardy, sweet, and almost oceanic. Paired with a pea puree that is bright green, silky, and herbaceous, this dish looks like it took hours. It didn’t. But what it delivers nutritionally absolutely did take nature time to build.
The real story here is zinc. Sea scallops are among the densest non-oyster sources of dietary zinc available, providing roughly 3.7 mg per 100g of cooked flesh. Zinc is a cofactor in over 300 enzymatic reactions in the human body, playing irreplaceable roles in immune function, protein synthesis, wound healing, and DNA transcription. Paired with the folate-rich pea puree (green peas deliver approximately 65 mcg of folate per 100g), this plate creates a synergistic nutritional profile that supports cell division, red blood cell formation, and cognitive function in a single elegant course. The addition of shallots, garlic, and a touch of lemon zest brings both culinary brightness and additional micronutrient depth from quercetin-rich alliums.
Calibrated Cuisine built three genuinely distinct cooking pathways for this recipe. The stovetop method is the gold standard for scallop cookery, using high heat and precise timing for the perfect crust. The slow cooker method transforms the dish into a gently poached preparation where the scallops are added only at the very end, relying on residual heat for a tender, no-sear approach. The pressure cooker method uses steam-infusion to cook the pea puree in minutes and then finishes the scallops in a quick saute on the Saute function. Each method is a genuinely different culinary experience with the same exceptional nutritional result.
4
servings
Ingredients
- 600 glarge dry-packed sea scallops (about 16 to 20 scallops), side muscle removed
- 500 gfrozen or fresh shelled green peas
- 2 tbspextra-virgin olive oil
- 1 tbspunsalted butter
- 2 mediumshallots, finely minced
- 3 clovesgarlic, finely minced
- 120 mllow-sodium vegetable or seafood stock
- 60 mlheavy cream
- 15 gfresh mint leaves
- 10 gfresh flat-leaf parsley leaves
- 1 tsplemon zest, finely grated
- 1 tbspfresh lemon juice
- 0.5 tspground white pepper
- 1 tspsmoked paprika, for dusting
- —Colima Sea SaltMicroplastic Free Salt and freshly ground black pepper to taste
- —Pea shoots or microgreens, for garnish
- —Cold-pressed flaxseed oil or high-quality extra-virgin olive oil, for finishing drizzle
Instructions
Click on an item below to shop for the recommended items for this recipe on Amazon.
As an Amazon Associate, we earn from qualifying purchases.
- Pat the scallops thoroughly dry with paper towels on all sides. This step cannot be skipped. Season both flat faces generously with fine sea salt, freshly ground black pepper, and a light dusting of smoked paprika. Allow them to rest uncovered at room temperature for 10 to 15 minutes while you prepare the puree. Any surface moisture remaining will steam rather than sear the scallop.
- Make the pea puree: In a medium saucepan over medium heat, warm 1 tablespoon of olive oil. Add the minced shallots and a pinch of salt and cook, stirring occasionally, for 3 to 4 minutes until softened and translucent. Add the garlic and cook for another 60 seconds until fragrant. Pour in the stock and bring to a gentle simmer, then add the peas. Cook for 4 to 5 minutes for fresh peas or 3 minutes for frozen peas, just until bright green and tender. Do not overcook or the peas will lose their vivid color.
- Transfer the cooked pea mixture to a high-powered blender. Add the cream, mint leaves, parsley, lemon zest, lemon juice, and white pepper. Blend on high for 90 seconds until completely smooth and velvety. Taste and adjust seasoning. Pass the puree through a fine-mesh sieve for an ultra-smooth result if desired for a more elegant presentation. Keep warm in the saucepan on the lowest heat setting, stirring occasionally.
- Heat a large cast iron skillet or stainless steel pan over high heat for 2 to 3 minutes until it is smoking hot. Add the remaining 1 tablespoon of olive oil and swirl to coat. Working in two batches to avoid crowding, place the scallops flat-side down and do not move them. Sear for exactly 90 seconds to 2 minutes until a deep golden crust forms on the bottom. Add the butter to the pan, flip each scallop, and baste with the foaming butter for 60 to 90 seconds. The scallop should feel just firm with a slight give, like the base of your thumb. Transfer to a wire rack immediately to prevent carryover cooking.
- To plate, spoon a generous swoosh of warm pea puree onto each plate using the back of a spoon. Arrange 4 to 5 scallops per serving atop the puree, seared-side up. Finish with a drizzle of high-quality olive oil or flaxseed oil, a few pea shoots or microgreens, and a final pinch of flaky sea salt. Serve immediately, as scallops cool quickly.
- Combine the minced shallots, garlic, peas, stock, cream, white pepper, and a generous pinch of salt in the slow cooker insert. Stir to distribute evenly. Place the lid on and cook on Low for 2 hours. The long, gentle heat allows the shallots and garlic to mellow completely and infuse the peas with a deep, sweet aromatic base that a quick stovetop saute cannot replicate.
- After 2 hours, use an immersion blender directly in the slow cooker insert to blend the pea mixture until smooth, then add the fresh mint, parsley, lemon zest, and lemon juice. Blend again for 30 seconds. Alternatively transfer to a countertop blender in two batches, blend until very smooth, then return to the slow cooker. Taste and adjust salt. Switch the slow cooker to the Warm setting.
- Pat the scallops completely dry with paper towels on all sides and season lightly with salt, white pepper, and smoked paprika. Gently nestle the seasoned scallops in a single layer directly on top of the warm pea puree in the slow cooker. Place the lid back on and let the residual heat from the puree and the Warm setting gently cook the scallops for 10 to 14 minutes, depending on their size. Check at 10 minutes: the scallops should be just opaque throughout and feel slightly firm. They will not have a crust but will be exceptionally tender and silky.
- Carefully lift the scallops out with a slotted spoon or fish spatula. Spoon the pea puree into warm shallow bowls. Arrange 4 to 5 scallops per serving on the puree. Drizzle with finishing olive oil or flaxseed oil and garnish with pea shoots. Add a small pinch of flaky sea salt and a crack of black pepper directly over the scallops to provide contrast to their gentle, uncrusted texture.
- Set the Instant Pot to Saute on High and allow it to fully preheat for 3 to 4 minutes until the display reads HOT. Add 1 tablespoon of olive oil, then add the shallots and garlic. Saute for 2 to 3 minutes, stirring frequently, until softened and fragrant. Press Cancel to stop the Saute function.
- Add the peas, stock, cream, white pepper, and a generous pinch of salt to the pot. Stir to combine with the aromatics. Secure the lid and set the steam release valve to Sealing. Cook on Manual High Pressure for 2 minutes. When the cycle ends, perform a Quick Release by carefully switching the valve to Venting. Open the lid once the steam has fully escaped.
- Use an immersion blender directly in the pot to blend the pea mixture until smooth. Add the fresh mint, parsley, lemon zest, and lemon juice and blend for another 20 to 30 seconds until fully incorporated and bright green. Taste and adjust seasoning. Transfer the puree to a bowl and tent loosely with foil to keep warm. Wipe the inner pot dry with a paper towel, which is critical for searing.
- Pat the scallops completely dry. Season with salt, pepper, and a dusting of smoked paprika. Set the Instant Pot back to Saute on High and let it reheat for 2 full minutes. Add the remaining 1 tablespoon of olive oil. Sear the scallops in two batches, flat-side down, for 90 seconds without moving. Add the butter, flip, and cook for 60 seconds more. The Instant Pot inner pot retains heat well and can achieve excellent browning if the surface is completely dry.
- Spoon the warm pea puree into shallow bowls. Top each with 4 to 5 seared scallops, golden side up. Drizzle with finishing oil and top with pea shoots or microgreens. Serve immediately. The entire process from first Saute to plated dish takes under 30 minutes.
- Preheat your oven to 220C (425F) with the broiler element on and a rack positioned 15 cm (6 inches) from the top heating element. Place a heavy oven-safe baking dish or cast iron skillet in the oven while it preheats for at least 10 minutes. A preheated surface is essential to getting any color on the bottom of the scallops without overcooking them.
- Meanwhile, make the pea puree on the stovetop. In a medium saucepan over medium heat, warm 1 tablespoon of olive oil. Add the shallots and cook for 3 to 4 minutes until softened. Add the garlic and cook for 60 seconds more. Add the peas and stock and simmer for 4 to 5 minutes until the peas are bright and tender. Transfer to a blender with the cream, mint, parsley, lemon zest, lemon juice, and white pepper. Blend until very smooth. Season to taste and keep warm over the lowest stovetop heat.
- Pat the scallops completely dry on all sides with paper towels. Toss them gently in a bowl with the remaining 1 tablespoon of olive oil, salt, pepper, and smoked paprika until evenly coated. Arrange them in a single layer with flat sides down on the preheated baking dish. Make sure they are not touching each other so that the heat circulates around each one.
- Roast and broil for 8 to 10 minutes, checking at 8 minutes. The scallop tops should show light golden spotting and the bodies should be opaque throughout. To add extra browning, switch to broil-only for the final 90 seconds, watching carefully to prevent overcooking. Place the butter in small pieces over the scallops in the last 2 minutes of cooking and let it melt and baste them. Remove immediately when just cooked through.
- Spoon the warm pea puree onto plates in a wide, generous pool. Lift the scallops from the pan with a fish spatula and nestle 4 to 5 per serving onto the puree, golden side up. Spoon any butter and pan juices from the baking dish over each serving as a natural sauce. Finish with pea shoots, a drizzle of finishing oil, and flaky sea salt.
Nutrition Breakdown
Per 1 serving (makes 4)
Vitamins & Minerals
% Daily Value based on a 2,000 calorie diet (FDA reference)
🧬 Essential Amino Acids
% of recommended daily intake (RDA) per serving
🛡 Antioxidant Profile
The Nutrition Science
Zinc is frequently misunderstood as simply an immune-support mineral, but its biochemical role is far broader. As a structural component of zinc-finger proteins, it is essential for the transcription of hundreds of genes, including those governing inflammatory response, insulin receptor signaling, and neuroplasticity. Sea scallops (Placopecten magellanicus and Argopecten irradians) accumulate zinc in their adductor muscle tissue at concentrations reflecting the mineral-rich cold Atlantic and Pacific waters they filter-feed in. A 150g serving of cooked sea scallops provides approximately 3.0 to 4.0 mg of highly bioavailable heme-adjacent zinc, with an absorption rate estimated between 26% and 40%, significantly higher than plant-based zinc sources where phytates can reduce absorption to as low as 10%.
Folate from green peas works in concert with vitamin B12 from the scallops in the one-carbon metabolism pathway, converting homocysteine to methionine. Elevated plasma homocysteine is an independent cardiovascular risk factor, and maintaining adequate folate and B12 together is one of the most evidence-supported dietary strategies for keeping homocysteine in a healthy range. The peas in this recipe provide approximately 65 mcg folate per 100g (as 5-methyltetrahydrofolate, the most bioavailable natural form), and the scallops contribute roughly 2 mcg of vitamin B12 per serving, covering nearly 90% of the daily value for most adults.
The omega-3 fatty acids in scallops, while present in modest amounts compared to fatty fish, are exclusively the long-chain EPA and DHA forms, which are directly incorporated into cell membrane phospholipids and serve as precursors to anti-inflammatory eicosanoids. The optional finishing drizzle of cold-pressed flaxseed oil adds alpha-linolenic acid (ALA), further enhancing the anti-inflammatory lipid profile of the finished plate. Combined with the carotenoid lutein in the pea puree, which has been shown in prospective cohort studies to be inversely associated with age-related macular degeneration risk, this dish delivers micronutrient synergy that goes well beyond the sum of its individual ingredients.
Pro Tips
- Always buy dry-packed or chemical-free scallops labeled U/10 or U/15 (meaning under 10 or 15 per pound). Wet-packed scallops absorb up to 30% extra water by weight, diluting flavor, reducing nutritional density per gram, and making a proper sear nearly impossible.
- To maximize folate retention in the pea puree, keep the cooking time for the peas under 5 minutes. Folate is water-soluble and heat-sensitive; boiling peas for longer than 8 minutes can reduce folate content by up to 40%. Blending the peas immediately with their warm cooking liquid rather than rinsing them preserves leached folate in the final puree.
- Add a pinch of vitamin-C-rich ingredient such as a squeeze of extra lemon juice to the puree just before serving. Vitamin C significantly enhances non-heme iron absorption from the peas, and it also helps maintain the bright green chlorophyll color by stabilizing the pH of the puree against enzymatic browning.

This sounds like you’re really dialing in the bioavailability angle, which I love. Frozen peas actually retain their zinc and folate beautifully since they’re frozen at peak ripeness, but I’m curious if you’ve noticed sprouting making a measurable difference for you personally, or if it’s more about the enzyme activation theory? Either way, this dish would be a perfect vehicle for adding something like reishi or cordyceps powder to the puree itself, since the earthiness works so well with peas and you’d be stacking the stress-resilience benefits on top of that mineral density.
omg this looks incredible and im dying to know if you sprouted the peas or used frozen? ive been experimenting with sprouted pea shoots in purees lately and the enzyme activation is seriously next level for mineral bioavailability, plus my kids actually think theyre fancy when i tell them theyre eating “activated” peas lol. also that zinc content is everything for brain development so im totally making this for dinner this week, thanks for the detailed breakdown!
Oh I love this energy! Honestly, sprouted peas are amazing for bioavailability, but I’d gently flag that frozen peas at peak ripeness are pretty much doing the same heavy lifting nutritionally without the extra prep, which is huge if you’re busy. That said, if you’re already sprouting, you’re definitely getting some enzyme benefits that support nutrient absorption, so it’s a win either way! The zinc in this dish is such a game changer, especially for us managing inflammation or hormone balance – I notice a real difference in my skin and energy when I’m consistent with zinc-rich foods like scallops. Your kids thinking they’re eating “activated” peas is honestly the best strategy