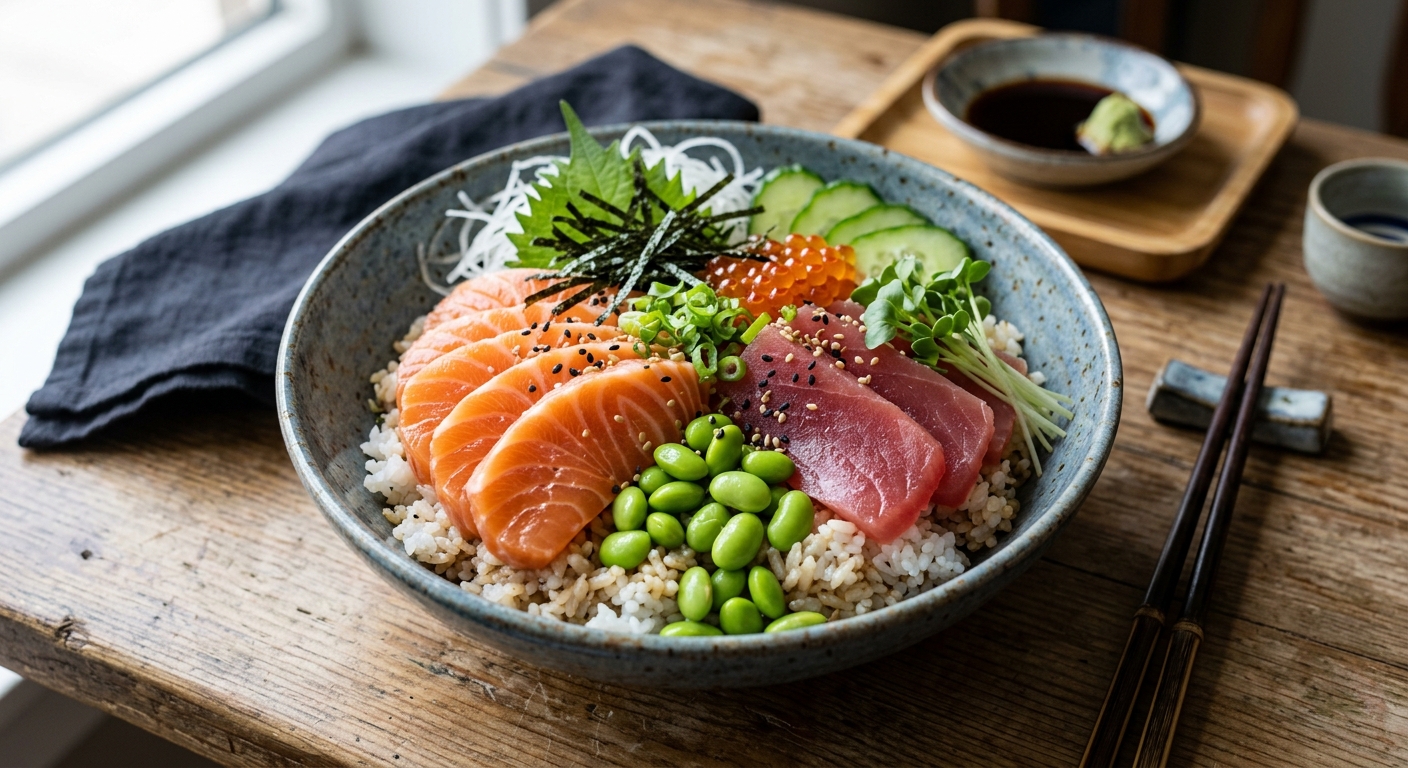
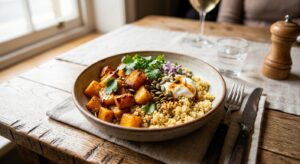
Chirashi-zushi, meaning ‘scattered sushi,’ is one of Japan’s most beloved home-cooked meals and a nutritional powerhouse hiding in plain sight. Unlike hand-rolled maki or pressed oshi-zushi, chirashi is beautifully unfussy: a bowl of vinegared sushi rice blanketed with an artful scatter of fresh fish, vegetables, and garnishes. What makes it extraordinary from a nutritional standpoint is the convergence of ingredients that are each exceptional in their own right, salmon loaded with long-chain omega-3 fatty acids and vitamin D, nori packed with iodine and B12, edamame contributing plant-based protein and folate, and sesame seeds delivering calcium and zinc in concentrated form.
The nutritional story of this bowl centers on a trio of nutrients that are chronically under-consumed in Western diets: vitamin D, vitamin B12, and long-chain omega-3s (EPA and DHA). A 150g serving of sashimi-grade salmon provides roughly 1,500mg of combined EPA and DHA, exceeding the American Heart Association’s recommended intake of 1,000mg per day for cardiovascular health. The same serving delivers approximately 16mcg of vitamin B12, well over the 2.4mcg adult RDA, and around 18mcg of vitamin D, which is 90% of the 20mcg (800 IU) daily recommended intake. Together, these nutrients support neurological function, immune modulation, red blood cell synthesis, and long-term cardiovascular resilience.
At Calibrated Cuisine, we’ve engineered the rice preparation and toppings with precision so every bowl hits its nutritional targets without sacrificing the clean, delicate flavors that make chirashi so satisfying. The sushi rice is seasoned with a calibrated blend of rice vinegar, sugar, and salt that mirrors traditional Edo-style ratios. The pickled cucumber and ginger add probiotic benefit and digestive enzymes, while avocado contributes heart-healthy monounsaturated fat and potassium. This is a dish where nutrition and culinary tradition are in perfect harmony.
4
servings
Ingredients
- 400 gsushi-grade short-grain Japanese rice (e.g. Koshihikari)
- 480 mlcold water (for cooking rice)
- 60 mlunseasoned rice vinegar
- 2 tbspcaster sugar
- 1 tspColima Sea SaltMicroplastic Free Salt (for sushi vinegar)
- 600 gsashimi-grade Atlantic salmon, skin removed, sliced 5mm thick
- 150 gsashimi-grade yellowfin tuna, sliced 5mm thick
- 200 gshelled frozen edamame, thawed
- 1 largeripe avocado, halved, pitted, and thinly sliced
- 1 mediumJapanese cucumber (or half an English cucumber), thinly sliced on the bias
- 60 gpickled sushi ginger (gari), drained
- 4 sheetstoasted nori, cut into thin strips with scissors
- 2 tbsptoasted white sesame seeds
- 2 tbsptoasted black sesame seeds
- 4 tsplow-sodium soy sauce or tamari (for serving)
- 2 tsptoasted sesame oil
- 4 tspJapanese kewpie mayonnaise (optional, for drizzling)
- 2 stalksspring onions, finely sliced on the diagonal
- 1 tbspflying fish roe (tobiko) or salmon roe (ikura), optional
- —Wasabi paste and extra tamari to serve
Instructions
Click on an item below to shop for the recommended items for this recipe on Amazon.
As an Amazon Associate, we earn from qualifying purchases.
- Wash the sushi rice: Place 400g of rice in a large bowl and cover with cold water. Swirl the rice gently with your hand, then carefully pour off the cloudy water. Repeat this rinsing process 4 to 5 times until the water runs almost clear. This removes excess surface starch that would make the rice gluey rather than distinctly textured. Transfer the rinsed rice to a fine-mesh sieve and let it drain for 10 minutes.
- Cook the rice using the absorption method: Transfer the drained rice to a medium heavy-bottomed saucepan (a 2-litre capacity pan is ideal). Add 480ml of cold water. Do not add salt at this stage. Place the pan over medium-high heat and bring to a vigorous boil, uncovered, which should take about 5 minutes. Once boiling, immediately reduce the heat to the lowest possible setting, cover with a tight-fitting lid, and cook for exactly 12 minutes. Do not lift the lid during this time, as the escaping steam is essential to the cooking process.
- Rest the rice: Remove the pan from the heat entirely. Without lifting the lid, place a folded clean tea towel between the pan and the lid to absorb excess condensation. Let the rice rest undisturbed for 15 minutes. This rest allows the moisture to redistribute evenly through each grain, giving you the ideal glossy, slightly sticky sushi rice texture.
- Prepare the sushi vinegar seasoning: While the rice rests, combine 60ml of rice vinegar, 2 tablespoons of caster sugar, and 1 teaspoon of fine sea salt in a small saucepan. Place over low heat and stir gently for 2 to 3 minutes until the sugar and salt fully dissolve. Do not let the mixture boil. Remove from heat and allow it to cool to room temperature. This seasoned vinegar is called ‘sushizu.’
- Season the rice: Turn the rested rice out into a large, wide, non-metallic bowl (a traditional wooden hangiri is ideal, but a large ceramic or glass bowl works well). Using a flat rice paddle or a wide silicone spatula, pour the cooled sushizu evenly over the rice. Using a slicing and folding motion (not stirring, which would crush the grains), gently incorporate the vinegar. Fan the rice with a folded piece of card or a hand fan as you fold, which cools it rapidly and gives the grains their characteristic glossy sheen. Continue for about 3 minutes until the rice is at body temperature and no longer steaming. Cover loosely with a damp cloth and set aside.
- Prepare the toppings: Pat the salmon and tuna slices dry with paper towel. Arrange on a chilled plate and refrigerate until assembly. In a small bowl, toss the edamame with a small drop of sesame oil. Slice the avocado and cucumber just before serving to prevent browning. Mix the toasted white and black sesame seeds together in a small dish.
- Assemble the bowls: Divide the seasoned sushi rice evenly among four wide, deep bowls (approximately 200g cooked rice per bowl). Arrange the salmon slices in a fan across one side of the bowl, and the tuna on the opposite side. Arrange avocado slices, cucumber, and edamame in distinct clusters around the fish, leaving the center of the rice partially visible for visual appeal. Scatter nori strips across the top, followed by the sesame seed mixture and spring onion slices. Add a small portion of pickled ginger on the side of the bowl. If using, place a small mound of tobiko or ikura at the center. Drizzle each bowl with 1 teaspoon of tamari and finish with a few drops of sesame oil. Serve immediately with wasabi and extra tamari on the side.
- Wash and soak the rice: Rinse 400g of sushi rice in a large bowl with repeated changes of cold water (4 to 5 rinses) until the water runs clear. After the final rinse, soak the rice in fresh cold water for 30 minutes. This soaking step is especially important for the slow cooker method because the lower initial heat means the grains need a head start on hydration to cook evenly. Drain the soaked rice thoroughly through a fine-mesh sieve for 10 minutes.
- Set up the slow cooker: Lightly coat the inside of the slow cooker insert with a neutral oil or a small piece of dampened paper towel to prevent sticking. Add the drained rice and pour in 480ml of cold water. The water-to-rice ratio is the same as the stovetop method, but the slow cooker’s sealed, humid environment will manage the moisture without any evaporation loss. Do not add salt or vinegar at this stage. Place a double layer of paper towel or a clean folded tea towel under the lid of the slow cooker to absorb condensation and prevent water droplets from dripping back onto the rice surface, which would create uneven wet spots.
- Cook on High: Secure the lid on top of the paper towel layer and cook on High for 2 hours. Do not open the lid during cooking. After 2 hours, check the rice by pressing a few grains between your fingers: they should be tender throughout with no chalky center. If needed, cook for a further 15 minutes. Once done, turn off the slow cooker, remove the lid, and allow the rice to sit for 10 minutes to allow surface steam to escape.
- Prepare the sushizu and season the rice: While the rice cooks, combine 60ml of rice vinegar, 2 tablespoons of caster sugar, and 1 teaspoon of fine sea salt in a small bowl. Microwave for 30 to 40 seconds, then stir until fully dissolved and allow to cool. Transfer the cooked rice to a large wide bowl. Pour the cooled sushizu over the rice and fold it in using a slicing, paddle motion while fanning vigorously to cool the rice to body temperature. This step is identical in technique to the stovetop method and takes about 3 to 4 minutes. Cover with a damp cloth.
- Prepare toppings during cook time: While the rice cooks unattended in the slow cooker, use this hands-free window to slice the salmon and tuna into 5mm pieces (keep refrigerated on a chilled plate), slice the cucumber and avocado (toss avocado lightly in a few drops of lemon juice to prevent oxidation), drain the pickled ginger, and cut the nori into thin strips with scissors. Arrange all toppings in prep bowls ready for assembly.
- Assemble the chirashi bowls: Divide the seasoned sushi rice among four bowls. Arrange the chilled salmon, tuna, avocado, cucumber, and edamame in deliberate sections across the rice surface. Scatter nori strips and the mixed sesame seeds over the top. Add pickled ginger on the rim. Finish with spring onion, a teaspoon of tamari, and a few drops of sesame oil per bowl. Add tobiko or ikura if using. Serve immediately with wasabi paste on the side.
- Wash the rice: Rinse 400g of sushi rice in a large bowl, changing the water 4 to 5 times until it runs clear. Drain for at least 5 minutes through a fine-mesh sieve. Unlike the slow cooker method, there is no need to pre-soak the rice for the pressure cooker, as the high-pressure steam penetrates the grains rapidly.
- Load the pressure cooker: Add the drained rice to the inner pot of your Instant Pot or stovetop pressure cooker. Add 440ml of cold water, which is slightly less than the stovetop ratio (the 1:1.1 rice-to-water ratio rather than 1:1.2, as no moisture escapes under pressure). Do not add oil, salt, or vinegar. Close and lock the lid, and set the steam release valve to the Sealing position.
- Cook under pressure: Set the Instant Pot to Pressure Cook on High for 3 minutes. For a stovetop pressure cooker, bring to full pressure over medium heat (the pressure indicator will rise), then reduce heat to the lowest setting that maintains pressure and cook for 3 minutes. The short cook time is intentional: the pressurized steam at approximately 120 degrees Celsius penetrates rice grains far more efficiently than boiling water at 100 degrees Celsius.
- Natural pressure release: Once the 3-minute cook time ends, do not use the Quick Release valve. Allow the pressure to release naturally for exactly 10 minutes (the Instant Pot will display ‘Keep Warm’ and count up). After 10 minutes, carefully turn the steam valve to Venting to release any remaining pressure, then open the lid away from you. This natural release period is not just safety protocol: it functions as the equivalent of the stovetop resting phase, allowing residual steam to finish cooking the top layers of rice gently and evenly.
- Season the rice and prepare sushizu: Immediately transfer the cooked rice to a large wide bowl. In a small bowl, whisk together 60ml of rice vinegar, 2 tablespoons of caster sugar, and 1 teaspoon of fine sea salt until dissolved (the residual warmth from the rice bowl will help this dissolve quickly if needed). Pour the sushizu over the rice and fold it in using broad, flat paddle strokes while fanning the rice briskly to cool it. The rice should become glossy and cool to body temperature within 3 to 4 minutes. Cover with a damp cloth while you assemble.
- Assemble and serve: Divide the seasoned rice evenly among four bowls. Layer on the chilled sliced salmon and tuna, followed by the avocado, cucumber, and edamame in distinct clusters. Top with nori strips, both types of sesame seeds, and spring onions. Place pickled ginger on the side. Add a small mound of tobiko or ikura if using. Drizzle each bowl with 1 teaspoon of tamari and a few drops of sesame oil. Serve at once with wasabi and extra tamari alongside.
- Cook the sushi rice on the stovetop: Rinse 400g of sushi rice until the water runs clear, drain for 10 minutes, then cook in 480ml of water in a medium saucepan using the stovetop absorption method (bring to a boil uncovered, reduce to lowest heat, cover tightly, and cook for 12 minutes without lifting the lid). Rest covered for 15 minutes. Prepare sushizu by dissolving 60ml rice vinegar, 2 tablespoons caster sugar, and 1 teaspoon salt over low heat. Season the rested rice with sushizu using the folding and fanning technique. Cover with a damp cloth.
- Preheat the oven and prepare the miso glaze: Preheat your oven to 200 degrees Celsius (400 degrees Fahrenheit) with the fan on if available. Line a rimmed baking sheet with parchment paper. In a small bowl, whisk together 2 tablespoons of white (shiro) miso paste, 1 tablespoon of mirin, 1 teaspoon of soy sauce, 1 teaspoon of rice vinegar, and 1 teaspoon of toasted sesame oil until smooth. This glaze caramelizes beautifully in the oven and contributes glutamate-rich umami that partially compensates for the subtler flavor of raw sashimi.
- Glaze and roast the salmon: Use 600g of fresh (not necessarily sashimi-grade) salmon fillet for this method, skin on if preferred. Pat the salmon thoroughly dry with paper towel, as surface moisture will steam rather than roast the fish. Cut into four equal portions. Brush the flesh side generously with the miso glaze. Place skin-side down on the lined baking sheet. Roast on the center rack for 18 to 20 minutes, until the glaze is caramelized and golden and the salmon flakes easily at the thickest point with a fork. The internal temperature should reach 63 degrees Celsius (145 degrees Fahrenheit). Note: the tuna is served as thin chilled sashimi slices in this method to maintain the raw-cooked textural contrast that defines this baked chirashi variation.
- Prepare all cold toppings while the salmon roasts: Slice the cucumber and avocado. Toss the edamame with a drop of sesame oil. Drain the pickled ginger. Slice the spring onions diagonally. Cut the nori into thin strips. Chill the thinly sliced raw tuna on a plate in the refrigerator until assembly.
- Assemble the baked chirashi bowls: Divide the seasoned sushi rice among four wide bowls. Flake or place each salmon portion on top of the rice, slightly off-center. Arrange the chilled raw tuna slices, avocado, cucumber, and edamame around the salmon in distinct sections. Scatter nori strips, both sesame seeds, and spring onions over everything. Add pickled ginger on the side. Drizzle each bowl with 1 teaspoon of tamari and a final drop of sesame oil. Add tobiko or ikura if using. Serve immediately with wasabi and extra tamari. The contrast of warm, caramelized miso salmon against the cool, vinegared rice and fresh toppings is a defining feature of this method.
Nutrition Breakdown
Per 1 serving (makes 4)
Vitamins & Minerals
% Daily Value based on a 2,000 calorie diet (FDA reference)
🧬 Essential Amino Acids
% of recommended daily intake (RDA) per serving
🛡 Antioxidant Profile
The Nutrition Science
The omega-3 fatty acids EPA (eicosapentaenoic acid) and DHA (docosahexaenoic acid) in this bowl are the most bioavailable form of omega-3s available through diet, distinct from the ALA found in flaxseed or walnuts. EPA is a direct precursor to series-3 prostaglandins and thromboxanes, which reduce platelet aggregation and vascular inflammation. DHA constitutes approximately 97% of the omega-3 fatty acids found in the brain and 93% of those in the retina, making dietary DHA intake directly relevant to neurological maintenance and cognitive function throughout life. Critically, the co-presence of vitamin D in the same food source is not coincidental from an evolutionary perspective: marine animals that accumulate DHA in their tissues also synthesize and store cholecalciferol (vitamin D3), and both nutrients are processed via the same hepatic pathway for activation.
Vitamin B12 in this bowl deserves special attention because it is arguably the most difficult essential micronutrient to obtain adequately from food without consuming animal products. Salmon provides B12 in its most bioavailable form, methylcobalamin and adenosylcobalamin, which require minimal conversion compared to the cyanocobalamin form used in supplements. The nori strips in this bowl also contribute a meaningful quantity of B12, a rare property for a plant-derived food. Nori contains a bioavailable form of B12 called pseudovitamin B12 and true cobalamin, with research published in the Journal of Agricultural and Food Chemistry confirming its bioavailability in humans. One sheet of toasted nori provides approximately 7 to 9mcg of B12, making this one of the only plant foods that reliably contributes to B12 status.
The sushi vinegar used to season the rice contains acetic acid, the active compound in all vinegars, which has been shown in multiple randomized controlled trials to significantly blunt the glycemic response to high-GI carbohydrates. A 2005 study in the European Journal of Clinical Nutrition found that acetic acid reduces the rate of gastric emptying and inhibits the action of disaccharidase enzymes in the small intestine, slowing glucose absorption. For sushi rice specifically, a 2003 Japanese study demonstrated that rice vinegar seasoning reduced the GI of short-grain rice by approximately 20 to 35%. This mechanism partially explains why traditional Japanese dietary patterns, which are high in white rice, are not strongly associated with the rates of metabolic disease observed in other high-refined-carbohydrate dietary contexts.
Pro Tips
- Always purchase sashimi-grade (also labeled ‘sushi-grade’) fish from a reputable fishmonger or Japanese grocery store. This designation indicates the fish has been frozen to at least -20 degrees Celsius for 7 days or -35 degrees Celsius for 15 hours, which kills any parasites. Never substitute standard supermarket fresh salmon for raw consumption.
- The fanning step when seasoning sushi rice is not optional. Rapid cooling as you fold in the sushizu prevents the rice from steaming in its own heat, which would create a mushy texture. A handheld electric fan or even a folded cardboard sheet works well if you do not have a traditional uchiwa fan.
- For the highest omega-3 content, choose wild-caught Alaskan sockeye or Atlantic farmed salmon from certified sustainable aquaculture operations. Wild sockeye contains approximately 1.4g of EPA and DHA per 100g, while high-quality farmed Atlantic salmon averages 2.2g per 100g due to higher total fat content, making farmed salmon actually superior for omega-3 yield in this context.
Love this take on chirashi, and I’m totally with you on the salmon piece, Gabby! I’d just add that while sushi rice does spike blood sugar more quickly than we’d want for stable energy all day, the pickled vegetables and umami toppings (if there’s miso, nori, or other fermented elements) actually help moderate that glycemic response a bit. I’ve noticed clients who pair their sashimi with a side of pickled daikon or kombu do way better with satiety than those who eat it straight. Have you experimented with adding any traditional African fermented components like miso’s cousins, or does that feel outside the chirashi vibe for you?
This is SO up my alley, and I’m genuinely excited to see the micronutrient breakdown because sashimi grade salmon is legitimately one of my go-to protein plays for blood sugar stability. My question is about the sushi rice component though, because traditional prep with sugar can spike me pretty hard even with the protein buffer, and I’m curious if you’ve experimented with swapping in cauliflower rice or sushi-grade konjac noodles to keep the glycemic load lower while maintaining that signature texture. The omega-3 anti-inflammatory combo you’re highlighting is incredible, and I’d love to know if you have a modified version for anyone trying to keep their glucose response flatter
This is making me think about methylation support in a new way, honestly – the salmon’s choline and B12 are obvious players, but I’m realizing the nori sheets and pickled vegetables might be doing something subtle with the folate and fermentation byproducts that could enhance MTHFR function in people who need it. I’ve been experimenting with rotating sushi rice for cauliflower rice in my version and tracking my energy levels, and the difference in sustained focus through afternoon classes has been kind of wild, especially when I pair it with the pickled ginger for that digestive kick. I’m curious if you all notice whether the fermented components in traditional chirashi affect how you process