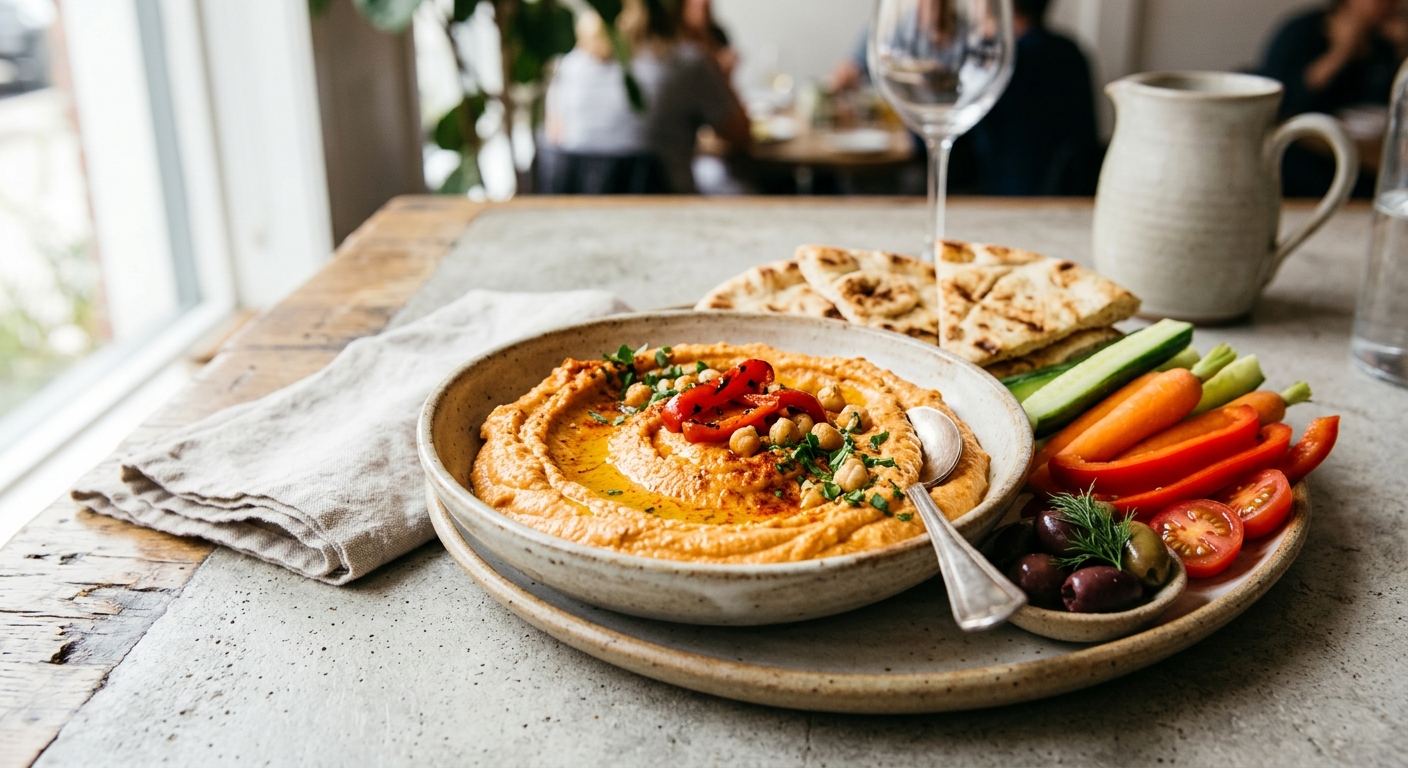
Hummus is one of the oldest foods in continuous production on the planet, and for good reason. When you build it from scratch using dried chickpeas cooked to creamy perfection and real fire-roasted red peppers, you transform a humble dip into a nutritional powerhouse. This Roasted Red Pepper Hummus Plate is not a snack platter dressed up as dinner. It is a fully composed meal, calibrated to deliver meaningful amounts of vitamin C, beta-carotene, folate, iron, and plant-based protein across every component on the board.
The roasted red peppers do extraordinary work here. A single large red bell pepper contains more vitamin C than an orange, and roasting concentrates the sugars while softening the flesh into a deep, jammy sweetness that blends seamlessly into the chickpea base. The carotenoid pigments responsible for that vivid scarlet color, including beta-carotene and lycopene, are fat-soluble, which means the tahini and olive oil in this recipe actively improve your body’s ability to absorb them. This is nutritional science expressed through cooking technique.
Four cooking methods are included because the chickpeas are the heart of this dish, and how you cook them shapes the final texture. Stovetop gives you maximum control. The oven method dry-roasts the chickpeas for a toasted, nutty depth before blending. The slow cooker produces exceptionally tender, almost molten chickpeas ideal for the creamiest possible hummus. The pressure cooker delivers fully cooked chickpeas in under an hour from dried, no soaking required. Choose your method, follow the specific steps, and arrive at the same luminous, spoonable result.
4
servings
Ingredients
- 300 gdried chickpeas (or 600g cooked / canned, drained)
- 3 largered bell peppers (approximately 450g total)
- 90 gtahini (well-stirred)
- 3 tbspextra-virgin olive oil, plus more to finish
- 3 clovesgarlic, peeled
- 3 tbspfresh lemon juice (about 2 lemons)
- 1 tspground cumin
- 0.5 tspsmoked paprika
- 0.25 tspcayenne pepper
- 60 mlice-cold water, plus more as needed
- 2 tbspaquafaba (reserved chickpea cooking liquid)
- 200 gcucumber, sliced into batons
- 200 gcarrots, peeled and cut into sticks
- 150 gcherry tomatoes, halved
- 4 pieceswhole wheat pita bread or flatbread
- 2 tbspfresh flat-leaf parsley, finely chopped
- 1 tbsptoasted pine nuts or sesame seeds
- —Colima Sea SaltMicroplastic Free Salt and black pepper to taste
Instructions
Click on an item below to shop for the recommended items for this recipe on Amazon.
As an Amazon Associate, we earn from qualifying purchases.
- Drain and rinse the soaked chickpeas. Place them in a large heavy-bottomed pot and cover with fresh cold water by at least 8cm. Bring to a vigorous boil over high heat, skimming any foam that rises to the surface during the first 10 minutes. Reduce heat to a steady simmer, partially cover, and cook for 60 to 90 minutes until the chickpeas are completely tender and a few have begun to split. They should crush easily between your fingers with no resistance. Reserve 120ml of the cooking liquid (aquafaba) before draining.
- While the chickpeas cook, char the red bell peppers directly over the stovetop gas flame using tongs, turning every 2 minutes until the skin is blackened and blistered on all sides, about 10 to 12 minutes total. If using an electric hob, place peppers under a broiler set to high, turning every 3 minutes. Transfer the charred peppers immediately to a bowl and cover tightly with plastic wrap or a plate. Allow to steam for 15 minutes. This makes the skins slide off effortlessly.
- Peel the peppers over the bowl to catch all juices, discard the skins and seeds, and roughly chop the flesh. Set aside with any accumulated juices. Mince 2 of the 3 garlic cloves finely, then rub them with a pinch of salt using the flat of a knife to form a smooth paste. This mellows the raw garlic bite.
- In a food processor, combine the tahini and lemon juice. Process for 90 seconds until the tahini lightens in color and becomes thick and whipped. This technique, processing the tahini alone first, is the professional secret to ultra-creamy hummus. Add the garlic paste, cumin, smoked paprika, cayenne, and 1 teaspoon of fine sea salt. Process for another 30 seconds.
- Add the warm drained chickpeas and all the roasted pepper flesh with its juices. Process continuously for 3 to 4 minutes, gradually drizzling in the ice-cold water and olive oil through the feed tube. The cold water and fat emulsify into the chickpea proteins, creating a mousse-like texture. Taste and adjust seasoning with more lemon, salt, or cumin. If the hummus is too thick, add aquafaba one tablespoon at a time. Spread onto plates with the back of a spoon creating a well in the center. Drizzle with olive oil, scatter parsley, pine nuts, and a pinch of smoked paprika. Serve with crudites and warm pita.
- Drain and rinse the soaked chickpeas. Transfer them to the slow cooker insert. Add the 3 whole peeled garlic cloves directly into the pot with the chickpeas. Cover with fresh water by 5cm. Do not add salt at this stage. Place the lid on, set to Low, and cook for 8 to 10 hours until the chickpeas are meltingly tender and several have begun to disintegrate into the liquid. The cooking liquid will be starchy and creamy, which is exactly what you want. Scoop out 120ml of this liquid as aquafaba before draining.
- About 30 minutes before the chickpeas finish cooking, roast the red bell peppers under a broiler set to high. Place the whole peppers on a foil-lined baking sheet and position the rack about 10cm from the heating element. Roast for 20 to 25 minutes, turning with tongs every 5 to 6 minutes, until the skin is evenly blackened and the pepper has collapsed slightly. Transfer to a bowl, cover with foil, and steam for 15 minutes. Peel, seed, and chop, reserving all juices.
- Drain the cooked chickpeas and garlic cloves together into a colander. The garlic will be sweet and completely tender from the long slow cook, eliminating any sharpness. There is no need for the garlic paste technique used in the stovetop method because the slow-cooked garlic is already mellow and spreadable.
- In a food processor, process the tahini and lemon juice together for 90 seconds until pale and thickened. Add the slow-cooked garlic cloves directly from the pot, cumin, smoked paprika, cayenne, and 1 teaspoon sea salt. Process to combine. Add the warm chickpeas and all of the roasted pepper. Process for 3 to 4 minutes, adding ice-cold water and olive oil gradually. Because the slow-cooked chickpeas are so tender, you will need slightly less water than the stovetop version. The result should be noticeably smoother.
- Taste carefully and adjust seasoning. The slow cooker method slightly mellows the overall flavor profile, so you may want an extra squeeze of lemon and a pinch more cumin to brighten the finish. Serve as described, garnished with olive oil, parsley, and toasted pine nuts alongside the crudite platter and warm pita.
- Place the dried unsoaked chickpeas and the 3 whole peeled garlic cloves in the pressure cooker or Instant Pot inner pot. Add water to cover by 6cm (approximately 1.5 liters for 300g chickpeas). Do not add salt or acidic ingredients as these will prevent the chickpeas from softening properly under pressure. Seal the lid, ensure the valve is set to Sealing, and cook on High Pressure (Manual or Pressure Cook setting) for 40 minutes. Allow for a full natural pressure release, at least 20 minutes, before opening the lid. The chickpeas should be very tender and a few should be falling apart.
- While the chickpeas are under pressure, roast the red peppers directly over a gas flame on your stovetop using tongs, charring all sides over about 10 to 12 minutes, then steam in a covered bowl for 15 minutes. Alternatively, roast under the broiler as described in the slow cooker method. Peel, seed, chop, and reserve all juices. This step runs concurrently with the pressure cooking and does not add to total time.
- Once pressure has fully released, open the lid and check the chickpeas. They should crush effortlessly with no resistance. Scoop out 120ml of the starchy cooking liquid. Drain the chickpeas and garlic together. At this point, for maximum creaminess, spread the hot drained chickpeas on a clean kitchen towel and gently rub them to remove the outer skins. This extra step is especially worthwhile in the pressure cooker method as it removes the last textural barrier to a perfectly smooth hummus. It takes about 3 minutes and is entirely optional.
- Process the tahini and lemon juice in a food processor for 90 seconds until pale and airy. Add the tender pressure-cooked garlic cloves, cumin, smoked paprika, cayenne, and 1 teaspoon sea salt. Add the warm chickpeas and all of the roasted pepper with juices. Process continuously for 3 minutes, gradually adding ice-cold water and olive oil. Because pressure-cooked chickpeas can vary slightly in final moisture content, add aquafaba from the cooking liquid as needed to reach your preferred consistency.
- Taste and season. The pressure cooking method produces a hummus with a slightly more neutral base flavor compared to stovetop, making the roasted pepper and smoked paprika flavors especially prominent. Serve immediately on warmed plates, finished with a generous drizzle of olive oil, chopped parsley, pine nuts, and a dusting of smoked paprika, alongside the crudite board and pita.
- Preheat the oven to 220C (200C fan, 425F, Gas Mark 7). Line a large rimmed baking sheet with foil. Place the whole red bell peppers on one half of the baking sheet. Drain and rinse the canned or pre-cooked chickpeas thoroughly, then pat them very dry with paper towels. This drying step is critical because moisture prevents caramelization. Toss the dried chickpeas with 1 tablespoon of the olive oil, a pinch of salt, and the smoked paprika. Spread them in a single layer on the other half of the baking sheet. Nestle the 3 garlic cloves, still in their skins, onto the pan as well.
- Roast everything together at 220C for 25 to 30 minutes. Check the chickpeas at 20 minutes. They should be turning golden and lightly crisp on the outside while remaining tender inside. Remove the chickpeas and garlic to a bowl when they are done. Continue roasting the peppers, turning with tongs every 8 to 10 minutes, for a total of 40 to 50 minutes until the skin is deeply charred and the peppers have collapsed and are beginning to caramelize where they touch the foil. Transfer to a bowl, cover tightly, and steam for 15 minutes.
- Reserve about one third of the oven-roasted chickpeas in a small bowl to use as a garnish later. These toasted chickpeas add a satisfying crunch to the finished plate and are one of the signature elements of the oven method. Peel the roasted garlic by squeezing the cloves from their skins. The oven-roasted garlic will be sweet, nutty, and completely mellow, quite different in character from the raw garlic paste used in the stovetop version.
- Peel, seed, and chop the roasted peppers, reserving all accumulated juices. In the food processor, combine tahini and lemon juice and process for 90 seconds until pale and thick. Add the squeezed roasted garlic, cumin, cayenne, and 1 teaspoon sea salt. Process to combine. Add the two thirds of the roasted chickpeas and all the roasted pepper with juices. Process for 3 to 4 minutes, adding ice-cold water and olive oil gradually. The oven-roasted chickpeas will produce a hummus with a slightly drier, more golden color and a noticeably nuttier, more caramelized flavor profile.
- Adjust seasoning to taste. Because the oven method produces such rich, deep flavors in the base, a brighter acidic finish is especially welcome here. Add an extra squeeze of lemon juice to lift everything. Spread onto plates, drizzle generously with olive oil, top with the reserved crunchy roasted chickpeas, chopped parsley, and a pinch of smoked paprika. Serve alongside the crudite platter and warmed pita bread.
Nutrition Breakdown
Per 1 serving (makes 4)
Vitamins & Minerals
% Daily Value based on a 2,000 calorie diet (FDA reference)
🧬 Essential Amino Acids
% of recommended daily intake (RDA) per serving
🛡 Antioxidant Profile
The Nutrition Science
The nutritional genius of this dish lies in synergy. Red bell peppers are among the richest food sources of vitamin C on earth, with a single large pepper providing up to 170mg, well exceeding the adult RDA of 90mg. But vitamin C’s role here extends beyond its own antioxidant activity. The iron in chickpeas is non-heme iron, the plant-based form that the human body absorbs at only 2 to 8% efficiency under normal circumstances. Vitamin C consumed in the same meal converts ferric iron (Fe3+) to ferrous iron (Fe2+) in the gut, increasing non-heme iron absorption by as much as threefold. Eating this plate is not just consuming iron and vitamin C separately. It is activating a biochemical mechanism that multiplies the nutritional return on both.
The fat-soluble carotenoids in roasted red peppers, primarily beta-carotene, lycopene, and lutein, present a different absorption challenge. These pigment molecules are embedded in the cell matrix of the pepper and require dietary fat to be properly absorbed into the lymphatic system via micelle formation in the small intestine. Research published in the American Journal of Clinical Nutrition found that consuming carotenoid-rich vegetables with even a modest amount of fat increased beta-carotene absorption by 4 to 8 times compared to a fat-free meal. The 18 grams of fat per serving in this recipe, contributed by tahini and olive oil, are not caloric excess. They are a delivery mechanism for the very nutrients that make this dish worth eating.
Chickpeas contribute a resistant starch and high soluble fiber profile that directly supports the gut microbiome. The prebiotic fiber in chickpeas, primarily oligosaccharides and pectin-like polysaccharides, feeds Bifidobacterium and Lactobacillus species in the colon, producing short-chain fatty acids like butyrate that maintain the intestinal lining and regulate systemic inflammation. This fiber matrix also slows gastric emptying, which moderates the glycemic response to the carbohydrates in the pita and chickpeas. The 14g of fiber per serving represents 50% of the daily adequate intake in a single meal.
Pro Tips
- For the absolute smoothest hummus, add a half teaspoon of baking soda to the soaking water overnight. The alkaline environment weakens the pectin in the chickpea cell walls, allowing them to cook significantly softer. Rinse thoroughly before cooking.
- The ice-cold water step is not optional. Cold water causes the chickpea starch granules and tahini proteins to swell and emulsify differently than warm water, creating a lighter, whipped texture rather than a dense paste. Keep a glass of water in the refrigerator while you cook.
- Make the hummus base up to 4 days ahead and refrigerate in an airtight container. The flavor actually deepens on day two as the roasted pepper, garlic, and cumin meld together. Bring to room temperature and stir vigorously before serving, adding a splash of cold water to restore the creamy consistency.

omg yes, the red peppers are such a smart move here! i’ve been leaning into vitamin C foods for immune support, but what i’m most excited about is how chickpea-based hummus actually helps with my insulin response compared to other appetizers. the fiber + protein combo keeps my blood sugar stable, which is honestly game-changing for managing my PCOS symptoms. have you tested the glycemic impact of adding different tahini ratios? i find the fat content really helps slow digestion, and i’m always looking to dial in my recipes even more!
Rosa, that’s a really keen observation about the glycemic response. Chickpeas have that favorable resistant starch profile, especially when you let them cool after cooking. What I’d add is that tahini brings something equally important here: sesame is one of the few plant sources with a meaningful omega-3 to omega-6 ratio that doesn’t lean heavily toward inflammatory linoleic acid. So you’re getting blood sugar stability plus anti-inflammatory support in one dip, which compounds the benefit when you’re pairing it with those vitamin C-rich peppers.
This is such a beautiful breakdown of how the whole plate comes together, Oliver. I’m curious though if you’ve experimented with adding black pepper to hummus for curcumin synergy, or even a pinch of turmeric for that extra anti-inflammatory layer? In Ayurveda, we’d say tahini’s warming, grounding quality pairs beautifully with turmeric’s cooling yet deeply nourishing action, and the black pepper would help with absorption of both. I’ve noticed in my own teaching that when students layer their spices intentionally like this, they feel the difference in how their digestion responds, which honestly might be part of what Rosa is sensing with that insulin stability too.