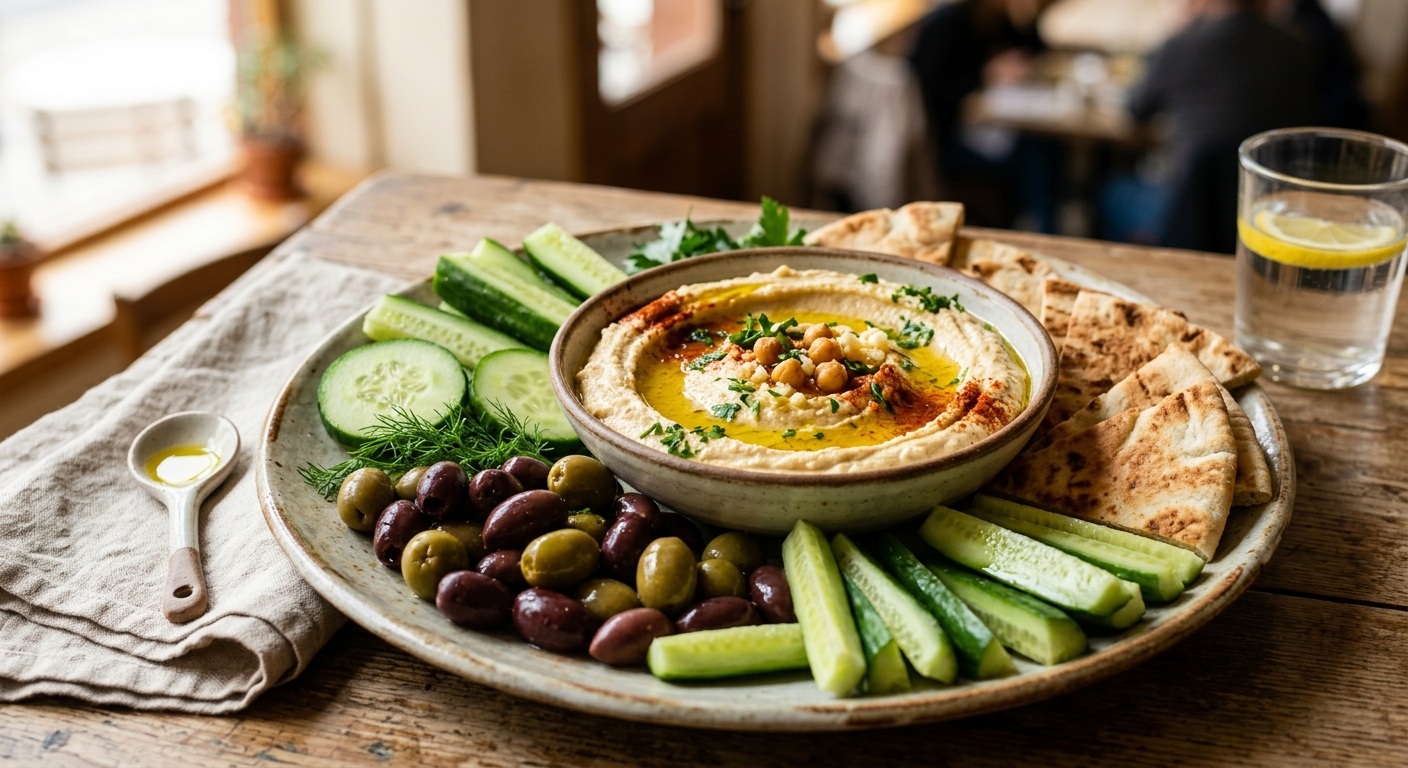
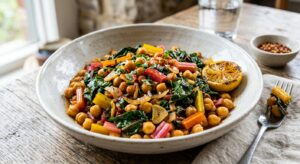
The Mediterranean light plate is one of those rare dishes where simplicity and nutritional density intersect perfectly. Cucumber slices fanned around a generous bowl of freshly made hummus, scattered with Kalamata olives, a drizzle of grassy extra-virgin olive oil, and a dusting of smoked paprika, this is the kind of meal that looks effortless but delivers serious micronutrient firepower. Every component earns its place both culinarily and biochemically.
Homemade hummus is the star here, and it is worth every extra minute compared to store-bought. When you cook your own chickpeas from dried, you control sodium, you preserve more of the folate that leaches into canning liquid, and you get a dramatically creamier, silkier texture. The tahini brings calcium and a full complement of B vitamins. The lemon juice does double duty: it brightens the flavor and its vitamin C dramatically increases the non-heme iron absorption from the chickpeas, a synergy that nutritional scientists call the ascorbate-iron enhancement effect. Meanwhile, the olives contribute hydroxytyrosol and oleuropein, two of the most potent anti-inflammatory phenolic compounds found in any whole food.
This recipe gives you four production methods for the chickpea base, from a quick pressure cooker run to a slow overnight simmer, because the humble chickpea responds beautifully to each approach with subtly different textural results. The cucumber and olive components require zero cooking, making this plate genuinely achievable on any schedule, any equipment level, and any energy budget. Calibrated to meet or exceed the RDI for six key nutrients in a single serving, this is Mediterranean eating as the research intended it.
4
servings
Ingredients
- 300 gdried chickpeas, soaked overnight in cold water (yields approximately 720g cooked)
- 2 literscold water, for soaking
- 1 literlow-sodium vegetable stock or water, for cooking chickpeas
- 90 gtahini (sesame seed paste), well stirred
- 60 mlfresh lemon juice (about 2 large lemons)
- 3 clovesgarlic, minced or grated
- 4 tbspextra-virgin olive oil, divided, plus extra for drizzling
- 3 tbspice-cold water, for blending hummus
- 1 tspground cumin
- 0.5 tspsmoked paprika, for garnish
- 2 largeEnglish cucumbers (about 500g total), sliced into 5mm rounds or spears
- 120 gKalamata olives, pitted and halved
- 30 gfresh flat-leaf parsley, roughly chopped
- 1 tbspza’atar spice blend, for finishing
- 15 gtoasted sesame seeds, for garnish
- —Colima Sea SaltMicroplastic Free Salt and freshly ground black pepper to taste
Instructions
Click on an item below to shop for the recommended items for this recipe on Amazon.
As an Amazon Associate, we earn from qualifying purchases.
- Drain the soaked chickpeas and rinse them thoroughly under cold running water. Transfer to a large Dutch oven or heavy-bottomed saucepan. Add the vegetable stock or water, ensuring the liquid covers the chickpeas by at least 5cm. Bring to a rolling boil over high heat.
- Once boiling, reduce to a vigorous simmer and skim off any white or gray foam that rises to the surface using a ladle or large spoon. This takes about 5 minutes. Add 1 teaspoon of fine sea salt only after skimming (adding salt earlier toughens the skins). Reduce heat to medium-low, partially cover, and simmer for 60 to 75 minutes until the chickpeas are completely tender and can be crushed between your fingers with almost no resistance. They should be soft all the way through, not just on the outside.
- Reserve 120ml of the warm cooking liquid, then drain the chickpeas. For ultra-smooth hummus, peel the chickpeas while they are still warm by pinching each one between your thumb and forefinger to slip off the skin. This step is optional but produces noticeably silkier results.
- In a food processor, combine the tahini and lemon juice. Process for 90 seconds until the mixture becomes pale and whipped. Add the minced garlic, ground cumin, 2 tablespoons of olive oil, and half a teaspoon of salt. Process for another 30 seconds. Add three-quarters of the warm cooked chickpeas and blend for 2 minutes, streaming in the ice-cold water one tablespoon at a time. Taste and adjust salt and lemon. The cold water aerates the hummus for a lighter texture.
- Reserve the remaining chickpeas whole for topping. Spread the hummus onto a wide, shallow serving plate using the back of a spoon to create swooping wells. Arrange the cucumber rounds and spears in overlapping fans around the hummus. Scatter the halved Kalamata olives, reserved whole chickpeas, and chopped parsley across the plate. Drizzle generously with the remaining extra-virgin olive oil, dust with smoked paprika and za’atar, and finish with toasted sesame seeds. Season with black pepper and serve immediately at room temperature.
- Drain and rinse the soaked chickpeas. Transfer them to the slow cooker insert. Cover with the full liter of vegetable stock or water, ensuring chickpeas are submerged by at least 4cm. Do not add salt, lemon, or any acidic ingredient at this stage. Cover with the lid.
- Cook on Low for 8 to 10 hours or on High for 4 to 5 hours. The chickpeas are done when they are completely soft and yield to gentle pressure. Slow cooker chickpeas cooked this way often have a particularly yielding, almost buttery texture. Check at the 8-hour mark on Low and taste one from the center of the pot.
- Once cooked, use a slotted spoon to transfer the chickpeas to a bowl. Reserve 120ml of the cooking liquid and keep it warm in a small saucepan on the lowest stovetop setting. Season the cooking liquid lightly with salt at this point for any recipe notes. Allow the chickpeas to cool for 10 minutes until just warm enough to handle comfortably.
- In a food processor, whip the tahini and lemon juice together for 90 seconds until pale and airy. Add the garlic, cumin, 2 tablespoons of olive oil, and a generous pinch of salt. Pulse to combine. Add three-quarters of the slow-cooker chickpeas and process for 3 full minutes, streaming in the reserved warm cooking liquid gradually instead of ice water, as the slow-cooked chickpeas respond particularly well to their own starchy liquid for building body and a naturally silky consistency.
- Taste carefully and add additional lemon juice or salt as needed. The hummus from slow-cooked chickpeas will have a noticeably earthier, deeper flavor compared to canned or pressure-cooked versions. Assemble the plate as described: spread the hummus on a wide platter, arrange cucumber slices and spears, top with olives, reserved whole chickpeas, parsley, a generous pour of olive oil, smoked paprika, za’atar, and toasted sesame seeds. Serve at room temperature.
- Drain and rinse the soaked chickpeas (or use the quick-soak shortcut described in the method note). Add them to the pressure cooker inner pot. Pour in 900ml of the vegetable stock or water. Do not fill above the maximum fill line. The liquid should cover the chickpeas by at least 3cm. Do not add salt or lemon at this stage.
- Secure the lid and set the pressure release valve to Sealing. Select High Pressure (Manual or Pressure Cook on Instant Pot) and set the timer for 35 minutes. The pot will take approximately 12 to 15 minutes to reach full pressure before the timer begins.
- When the cook time ends, allow a natural pressure release for 15 minutes. Then carefully switch the valve to Venting to release any remaining steam. Open the lid away from you. The chickpeas should be very tender. If any are still firm, reseal and cook at High Pressure for an additional 5 minutes with a quick release.
- Using a slotted spoon, transfer the chickpeas to a bowl. Reserve 120ml of the hot cooking liquid. Because pressure-cooked chickpeas are often very hot and slightly fragile, let them rest for 5 minutes. For the smoothest hummus possible from this method, peel the skins from the chickpeas while still warm, as pressure cooking loosens the skins more than stovetop simmering, making peeling faster.
- In a food processor, combine the tahini and lemon juice and process for 90 seconds. Add the garlic, cumin, 2 tablespoons of olive oil, and salt. Process briefly. Add three-quarters of the pressure-cooked chickpeas and blend for 2 to 3 minutes, adding the reserved hot cooking liquid gradually. The starchy liquid from a pressure cooker is more concentrated than stovetop liquid, so add it slowly to avoid over-thinning the hummus. Finish with the ice-cold water if needed to achieve the desired light, airy consistency. Assemble the plate with cucumbers, olives, parsley, olive oil, smoked paprika, za’atar, and sesame seeds as described in the stovetop method.
- Preheat your oven to 220C (425F) with a rack in the upper-middle position. Drain and rinse two 400g cans of chickpeas (or use 720g of pre-cooked chickpeas from another method). Pat them completely dry with paper towels, as moisture is the enemy of crispy results. Divide into two equal portions on a large rimmed baking sheet lined with parchment paper.
- Drizzle one portion of chickpeas with 1 tablespoon of olive oil, a pinch of smoked paprika, cumin, salt, and pepper. Toss to coat and spread in a single layer on one half of the baking sheet. Cut a whole garlic head in half horizontally, drizzle the cut side with a little olive oil, wrap loosely in foil, and place on the other half of the baking sheet. Leave the second portion of chickpeas unroasted for the hummus base. Roast for 20 to 25 minutes, shaking the pan halfway through, until the chickpeas are golden, crisp, and beginning to split at the seams.
- While the chickpeas and garlic roast, prepare the hummus base using the unroasted chickpeas. In a food processor, process the tahini and lemon juice for 90 seconds. Squeeze out 3 to 4 roasted garlic cloves from the foil packet (reserve the rest for another use) and add them to the processor along with the cumin, 2 tablespoons of olive oil, and salt. Process for 30 seconds. Add the unroasted chickpeas and blend for 2 to 3 minutes, adding ice-cold water a tablespoon at a time until beautifully smooth. The roasted garlic creates a noticeably sweeter, more caramelized hummus flavor compared to raw garlic versions.
- Remove the crispy chickpeas from the oven and let them cool for 5 minutes on the pan; they continue to crisp as they cool. Do not cover them or they will steam and soften.
- Spread the roasted-garlic hummus onto a wide serving platter in generous swoops. Arrange the cucumber rounds and spears around the hummus. Pile the warm crispy roasted chickpeas directly over the center of the hummus where they will contrast beautifully with the silky base. Scatter the Kalamata olives and parsley across the plate, drizzle liberally with olive oil, dust with smoked paprika and za’atar, and finish with toasted sesame seeds. Serve immediately while the chickpeas are still warm and crisp.
Nutrition Breakdown
Per 1 serving (makes 4)
Vitamins & Minerals
% Daily Value based on a 2,000 calorie diet (FDA reference)
🧬 Essential Amino Acids
% of recommended daily intake (RDA) per serving
🛡 Antioxidant Profile
The Nutrition Science
The anti-inflammatory potency of this plate is rooted in the convergence of three distinct biochemical mechanisms. First, the oleocanthal in extra-virgin olive oil inhibits COX-1 and COX-2 enzymes by the same mechanism as ibuprofen, a finding first published in Nature by Beauchamp et al. that sparked widespread scientific interest in the Mediterranean diet’s pain-modulating properties. A typical 30ml serving of quality extra-virgin olive oil delivers a dose pharmacologically comparable to roughly 10% of a standard ibuprofen tablet. Across a lifetime of daily consumption, this chronic low-level COX inhibition is hypothesized to contribute significantly to the reduced rates of inflammatory diseases observed in Mediterranean populations.
Second, the chickpea-lemon pairing is a nutritional scientist’s example of food synergy in action. Chickpeas provide approximately 5.8mg of non-heme iron per serving, but non-heme iron is inherently less bioavailable than heme iron from animal sources, with typical absorption rates of only 2 to 20 percent. The 60ml of fresh lemon juice in this recipe provides approximately 22mg of ascorbic acid, which converts ferric iron (Fe3+) to the more soluble ferrous form (Fe2+) in the gut, and chelates it in a way that keeps it soluble even in the alkaline environment of the small intestine. Studies show that co-consuming ascorbic acid can increase non-heme iron absorption by up to 300 percent, making this pairing genuinely significant for anyone at risk of iron insufficiency.
Third, the tahini component provides a meaningful contribution of sesamin and sesamolin, lignans with dual antioxidant and lipid-modulating properties. Research published in the Journal of Nutritional Biochemistry demonstrates that sesamin supplementation reduces hepatic fatty acid oxidation and lowers LDL cholesterol without affecting HDL levels, a desirable lipid-modulating profile. Combined with the beta-sitosterol content of chickpeas, which competes with dietary cholesterol for intestinal absorption, this plate assembles a coherent, multi-pathway approach to cardiovascular protection that goes well beyond any single superfood acting alone.
Pro Tips
- For the absolute smoothest hummus, process the tahini and lemon juice alone for a full 90 seconds before adding any other ingredient. This step whips air into the tahini and creates the pale, mousse-like base that separates restaurant-quality hummus from home versions.
- Cucumber releases water over time and will dilute the hummus on the plate if left assembled for more than 20 minutes. If serving at a party or meal-prepping, store the cucumber separately and assemble just before serving.
- The quality of your extra-virgin olive oil has an outsized impact on the anti-inflammatory benefit of this dish. Look for oils with a harvest date (not just a best-by date) within the last 12 months, and choose varieties known for high phenolic content such as Koroneiki, Picual, or Coratina.

Love this question, Anna! So tahini actually brings both richness and calcium to hummus, but sunflower seed butter is a solid swap nutritionally and will give you that creamy base you need. Fair warning though: sunflower seed butter has a slightly different flavor profile, so you might want to add a touch more lemon juice to brighten it up. If you’re looking for other AIP-friendly options, I’ve had clients use roasted pumpkin seed butter too, which adds this lovely earthiness. The chickpeas are doing the heavy lifting here anyway in terms of the anti-inflammatory benefit, so the hummus will still deliver on that front!
This is such a thoughtful swap discussion! I’ve been experimenting with different seed butters for years now, and I totally agree that sunflower seed butter works beautifully here, Anna. I actually found that adding a tiny splash of apple cider vinegar along with extra lemon really brightens it up and also gives an extra anti-inflammatory boost, which I’ve noticed helps with my CRP levels. The chickpeas are absolutely the star ingredient for joint health, so even with the tahini swapped out, you’re still getting those wonderful polyphenols from the olives and that beautiful extra virgin olive oil that’s been my foundation for managing inflammation. Thanks so much for featuring this combo, and I love
This looks absolutely gorgeous, and I’m curious about a couple things for my AIP adaptation! Would the hummus work without the sesame tahini (since sesame is out for me), or would you recommend subbing in something like sunflower seed butter instead? Also, I’ve been cautious with chickpeas since going AIP, so I’m wondering if you have thoughts on whether the lectins in them might be problematic for those of us managing autoimmune stuff, or if the traditional hummus-making process somehow reduces them? I love the Mediterranean approach to anti-inflammatory eating and would love to make this work for my protocol.