
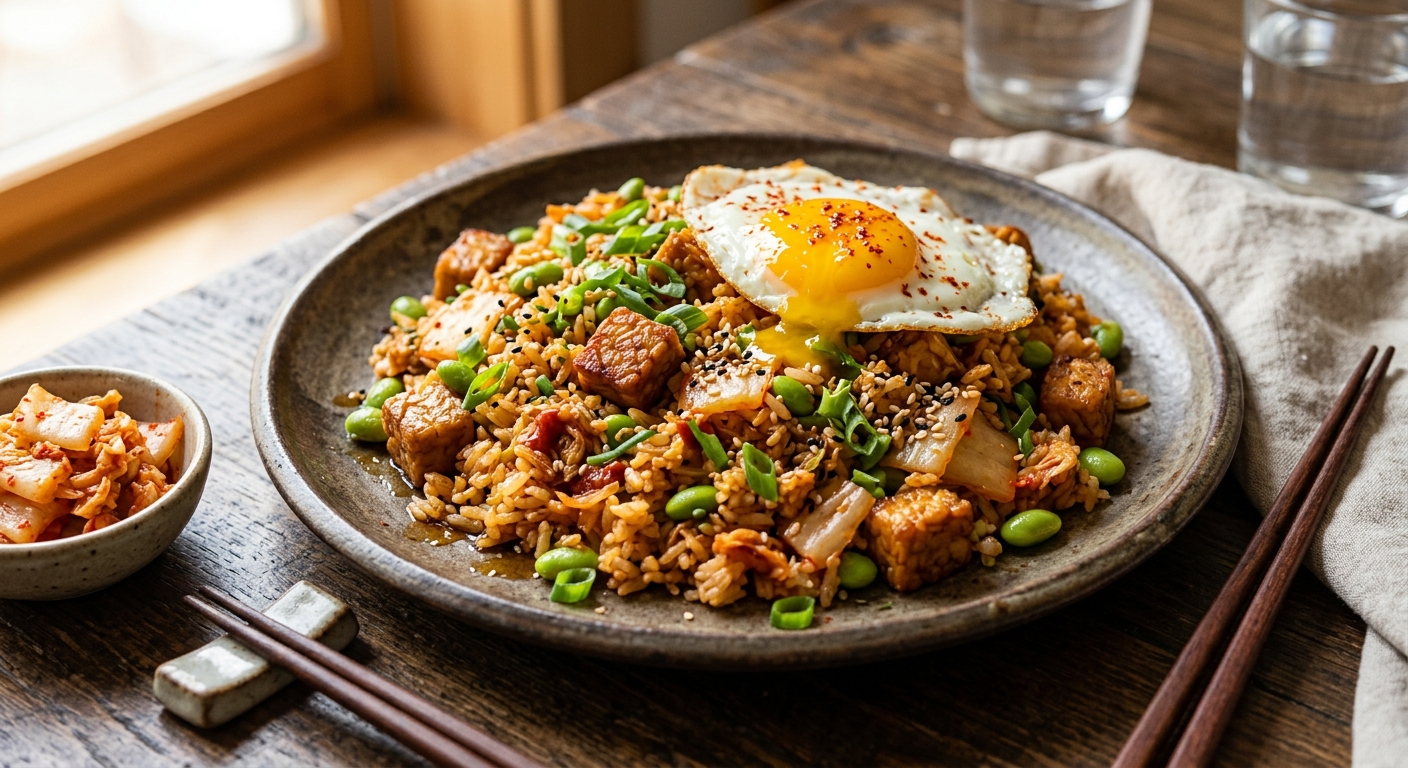
Fried rice is one of the world’s great comfort foods, but most versions leave your nutritional bases uncovered. This Tempeh and Kimchi Fried Rice flips that script entirely. By pairing two of the fermented food world’s heavyweights, Indonesian tempeh and Korean kimchi, you get a dish that is simultaneously a probiotic delivery system, a complete protein source, and an antioxidant powerhouse. The fermentation of both key ingredients pre-digests complex compounds, making nutrients dramatically more bioavailable than in their unfermented counterparts.
Tempeh is made from whole soybeans bound together by the mycelium of Rhizopus oligosporus, a process that not only creates a firm, sliceable cake but also reduces phytic acid by up to 60 percent, dramatically improving the absorption of zinc, iron, and manganese. Kimchi, fermented by naturally occurring Lactobacillus strains, contributes live probiotics alongside glucosinolates from napa cabbage and capsaicin from gochugaru chili, both of which have well-documented anti-inflammatory pathways. Together, they transform a bowl of fried rice into something genuinely functional.
On the culinary side, we treat this dish with the same respect a wok chef gives to proper wok hei: high heat, fast movement, cold day-old rice for perfect separation, and a final hit of toasted sesame oil added off the heat to preserve its delicate, nutty volatile compounds. Whether you make it on the stovetop for that authentic char, low-and-slow in a slow cooker for a hands-off weeknight, or under pressure for a speedy weekday lunch, each method has been designed to maximize both flavor and nutritional integrity.
4
servings
Ingredients
- 300 gtempeh, cut into 1 cm cubes
- 200 gkimchi, roughly chopped, brine reserved
- 600 gcooked jasmine rice, day-old and chilled
- 150 gfrozen edamame, thawed
- 3 tbspgochujang (Korean fermented chili paste)
- 2 tbsptamari (gluten-free soy sauce)
- 1 tbsprice vinegar
- 2 tbspkimchi brine (reserved from kimchi)
- 3 tbspAvocado Oil100% Pure Avocado Oil or other high-smoke-point Avocado Oil100% Pure Avocado Oil
- 1 tbsptoasted sesame oil
- 4 clovesgarlic, minced
- 1 tbspfresh ginger, finely grated
- 1 mediumyellow onion, finely diced
- 3 stalksspring onions, thinly sliced, whites and greens separated
- 1 tbspwhite sesame seeds, toasted
- 1 tspcoconut sugar or brown sugar
- —Colima Sea SaltMicroplastic Free Salt and white pepper to taste
- —Nori strips, sliced avocado, or fried egg (optional garnish)
Instructions
Click on an item below to shop for the recommended items for this recipe on Amazon.
As an Amazon Associate, we earn from qualifying purchases.
- Whisk together the gochujang, tamari, rice vinegar, kimchi brine, and coconut sugar in a small bowl until smooth. Set this sauce aside near the stove, as you will need it quickly once cooking begins.
- Heat a wok or the largest, heaviest skillet you own over the highest flame your burner allows for at least 3 minutes, until the surface is visibly smoking. Add 1.5 tablespoons of avocado oil, swirl to coat, and immediately add the tempeh cubes in a single layer. Do not stir for 90 seconds, allowing a deep golden crust to form. Toss and sear for another 60 to 90 seconds until all sides are caramelized. Season lightly with salt, then transfer to a plate.
- Without reducing the heat, add the remaining 1.5 tablespoons of oil to the wok. Add the diced onion and spring onion whites and stir-fry for 2 minutes until softened and lightly charred at the edges. Add the garlic and ginger and stir-fry for 45 seconds until deeply fragrant, scraping the bottom of the wok constantly.
- Add the chopped kimchi to the wok and stir-fry for 2 minutes until it begins to caramelize slightly and any excess liquid evaporates. This step builds the flavor foundation of the dish.
- Push all the aromatics to the edges of the wok, creating a clear hot center. Add the cold rice to the center and press it flat against the wok surface. Allow it to sit undisturbed for 60 seconds to develop a light crust on the bottom. Then fold the aromatics into the rice and toss vigorously for 2 minutes, breaking up any clumps.
- Pour the prepared sauce evenly over the rice and toss to coat every grain. Fold in the thawed edamame and the seared tempeh cubes. Stir-fry for 2 more minutes until everything is piping hot and the sauce has dried slightly and coated the rice rather than pooling.
- Remove the wok from the heat. Drizzle the toasted sesame oil over the rice and fold it in gently. The residual heat is sufficient to bloom the sesame aroma without burning off its volatile flavor compounds. Taste and adjust with white pepper or additional tamari.
- Divide among four bowls. Top with sliced spring onion greens, toasted sesame seeds, and any optional garnishes. Serve immediately.
- In a dry skillet over medium-high heat, sear the tempeh cubes in 1 tablespoon of avocado oil for 3 to 4 minutes, turning occasionally until golden on at least two sides. This step is worth doing even for the slow cooker, as it removes raw soy flavor from the tempeh and adds depth. Set the seared tempeh aside.
- Whisk together the gochujang, tamari, rice vinegar, kimchi brine, coconut sugar, and 60 ml of water in a bowl until completely smooth. This extra liquid compensates for the lack of evaporation in a sealed slow cooker environment.
- Add the diced onion, spring onion whites, garlic, ginger, chopped kimchi, and thawed edamame to the slow cooker insert. Pour the sauce over the vegetables and stir everything together. Nestle the seared tempeh cubes into the mixture.
- Cover and cook on Low for 1.5 hours. This initial phase melds the aromatics and partially cooks the sauce without any rice present, concentrating flavor and preventing the rice from over-absorbing liquid during the full cook.
- After 1.5 hours, stir the cold cooked rice directly into the slow cooker, breaking up clumps as you go. Fold everything together until the rice is evenly coated in the sauce. Replace the lid and continue cooking on Low for another 1 to 1.5 hours, until the rice is heated through and has absorbed the sauce. Check at the 1-hour mark: the rice should be tender and slightly sticky rather than wet.
- Turn off the slow cooker. Drizzle the toasted sesame oil over the surface, fold gently to incorporate, and season to taste with white pepper and salt. The sesame oil added off-heat retains far more of its aroma than it would under direct heat.
- Serve in bowls topped with spring onion greens and toasted sesame seeds. Note that this version will not have the char of the wok method, but the deeper, more melded flavors and tender texture are genuinely excellent.
- Replace the 600 g of day-old jasmine rice with 280 g (1.5 cups) of uncooked short-grain or sushi rice, rinsed three times until the water runs mostly clear. This adjusted quantity yields approximately the same cooked volume and serves four.
- Set the Instant Pot to Saute mode on High. Add 2 tablespoons of avocado oil and, once shimmering, add the tempeh cubes in a single layer. Sear for 2 to 3 minutes without stirring, then flip and sear for another 2 minutes. Remove the tempeh and set aside. Add the remaining oil, then cook the diced onion and spring onion whites for 2 minutes. Add the garlic and ginger and saute for 30 seconds. Press Cancel.
- Add the chopped kimchi to the pot and stir to combine with the aromatics. Whisk together the gochujang, tamari, rice vinegar, kimchi brine, coconut sugar, and 360 ml of water or low-sodium vegetable broth. Pour this over the kimchi and aromatics and stir well, scraping any browned bits from the bottom of the pot to prevent a burn warning.
- Add the rinsed uncooked rice to the pot and push it down gently into the liquid, ensuring it is mostly submerged. Do not stir after this point. Scatter the seared tempeh and thawed edamame over the top of the rice without mixing them in.
- Secure the lid, set the valve to Sealing, and cook on Manual High Pressure for 5 minutes. When the timer ends, allow a natural pressure release for 10 minutes, then carefully quick-release any remaining pressure. Open the lid away from you.
- Gently fold the entire contents of the pot together, combining the tempeh and edamame into the rice. The bottom layer may have a slight crust, which is desirable and intentional. Drizzle the toasted sesame oil over the top and fold once more.
- Taste and adjust seasoning with white pepper and additional tamari. Serve immediately topped with spring onion greens, toasted sesame seeds, and optional garnishes.
- Preheat your oven to 200C (400F) with a large, rimmed sheet pan or a 33×23 cm (9×13 inch) ceramic baking dish placed on the middle rack while the oven heats. A preheated pan is essential for crisping the bottom layer of rice.
- Whisk together the gochujang, tamari, rice vinegar, kimchi brine, coconut sugar, and 80 ml of water in a large mixing bowl. Add the cold cooked rice, chopped kimchi, thawed edamame, diced onion, spring onion whites, garlic, ginger, and 2 tablespoons of avocado oil. Toss thoroughly until every grain of rice is coated in the sauce.
- In a separate small bowl, toss the tempeh cubes with the remaining 1 tablespoon of avocado oil, a pinch of salt, and white pepper. The tempeh is kept separate at this stage so it can roast and crisp independently without steaming inside the rice mixture.
- Carefully remove the hot pan from the oven. Working quickly, spread the rice mixture in an even layer no more than 2.5 cm deep across the pan. Scatter the seasoned tempeh cubes over the top of the rice in a single layer. Return the pan to the oven.
- Bake for 20 minutes undisturbed. Then, using a wide spatula, fold the outer crispy edges into the center and spread flat again. Return to the oven for another 12 to 15 minutes until the top is lightly toasted, the tempeh is golden and firm, and the bottom and edges are noticeably crispy.
- Remove from the oven and immediately drizzle the toasted sesame oil evenly over the surface. The hot rice will bloom the sesame aroma beautifully. Let rest for 3 minutes before serving, which allows the crispy bottom layer to release from the pan more easily.
- Serve directly from the pan or scoop into bowls. Top with spring onion greens and toasted sesame seeds. The crispy rice bits throughout are the hallmark of this method and the reason baked fried rice has developed a devoted following.
Nutrition Breakdown
Per 1 serving (makes 4)
Vitamins & Minerals
% Daily Value based on a 2,000 calorie diet (FDA reference)
🧬 Essential Amino Acids
% of recommended daily intake (RDA) per serving
🛡 Antioxidant Profile
The Nutrition Science
The nutritional centerpiece of this dish is the concept of fermentation-enhanced bioavailability. Raw soybeans contain phytic acid at concentrations of 1 to 2 percent by weight, a compound that binds zinc, iron, and calcium and prevents their absorption in the small intestine. During the 24 to 48-hour fungal fermentation that produces tempeh, phytase enzymes secreted by Rhizopus oligosporus break down up to 60 percent of this phytic acid, converting mineral-bound complexes into free, absorbable ions. This is why 100 g of tempeh delivers genuinely usable zinc and iron, while an equivalent serving of cooked soybeans delivers far less despite having similar total mineral content on paper.
Kimchi contributes a distinct and complementary anti-inflammatory mechanism. The fermentation of napa cabbage by Lactobacillus plantarum and related strains produces short-chain fatty acids, particularly lactic acid, which reduce luminal pH in the gut and create conditions hostile to pathogenic bacteria. More directly relevant to inflammation, gochugaru peppers supply capsaicin, which binds the TRPV1 receptor on immune cells and inhibits the NF-kB transcription factor, a master regulator of the pro-inflammatory cytokine cascade. Randomized controlled trials have linked regular kimchi consumption to reduced C-reactive protein levels, a key blood marker of systemic inflammation, at intakes of approximately 100 g per day, which aligns closely with the 50 g per serving in this recipe across a day of two servings.
The combination of tempeh and edamame creates a complete amino acid profile that rivals whey protein in leucine content, the specific amino acid that triggers mTOR-mediated muscle protein synthesis. At 26 g of protein per serving with a leucine contribution exceeding 2 g, this dish comfortably exceeds the per-meal threshold of approximately 1.8 g leucine that research identifies as necessary to maximally stimulate muscle repair in adults. The addition of toasted sesame oil off the heat is not merely culinary preference: sesamol and sesamin, the primary antioxidant lignans in sesame oil, degrade at temperatures above 180C, making heat-free addition the scientifically correct technique for preserving their anti-inflammatory activity.
Pro Tips
- For the absolute best texture on the stovetop version, spread freshly cooked rice on a parchment-lined sheet pan and refrigerate uncovered for at least 4 hours or overnight. The surface drying and starch retrogradation that occurs during chilling is what produces distinct, non-clumping grains when they hit the hot wok.
- Taste your kimchi before cooking: younger kimchi (under 2 weeks) is bright and crunchy and works beautifully raw as a garnish, while older, more sour kimchi (over 4 weeks) caramelizes magnificently when fried and is the better choice for the cooked portions of this dish. Using a blend of both gives you the best of both worlds.
- To maximize the probiotic benefit of the kimchi, reserve 2 tablespoons of fresh, uncooked kimchi per serving and add it as a cold garnish on top of the finished, slightly cooled rice rather than cooking all of it. Heating kimchi above 70C kills the live Lactobacillus cultures, so this simple garnish habit doubles the probiotic delivery of the dish.


omg yes this is exactly what im talking about! tempeh hits different as a post-wod meal because its got all 9 essential amino acids plus that fermented factor for digestion, and pairing it with kimchi is chef’s kiss for managing inflammation after heavy lifting. the combination of complete protein + live cultures + those anti inflammatory compounds in fermented foods is basically optimized recovery in a bowl. definitely making this tonight and tracking how i feel during tomorrows session!
Been tracking the same thing with my CGM and amino acid profiles, Carla – tempeh’s bioavailability jumps significantly after that steaming step Chris mentioned, which directly impacts how quickly it hits your amino acid synthesis window post-workout. Have you noticed specific differences in your glucose response between this and non-fermented protein sources, or are you mainly tracking recovery metrics like soreness and performance? I’m curious if you’re seeing the probiotic factor actually move your inflammatory markers since most studies show meaningful changes require 4+ weeks of consistent fermented food intake.
ben honestly this is teh kind of detailed tracking i wish id been doing in my 50s lol, ngl after my heart attack at 58 i started paying obsessive attention to inflammation markers and glucose stability and ive been doing tempeh + kimchi combos in my slow cooker for like 18 months now – my triglycerides dropped 40 points and my hs-crp went from 3.8 to 1.2, which my cardiologist said was genuinely significant. i dont use a cgm but my fasting glucose normalized and the beauty of the fermentation double hit is that i feel less bloated and my digestion is just… better, and i
That’s a serious win, Sylvester, and honestly the kind of real world data that matters way more than most nutrition studies. The slow cooker method is genius for tempeh too, because that low and slow environment essentially does that bioavailability work we were talking about while the fermented foods do their thing on your gut flora. My clients with similar health markers always report exactly what you’re describing, better digestion and less systemic inflammation, once they nail the fermentation + prep combination. Keep riding that trend.
This is such a valuable point about prep methods! I’ve noticed the same thing in my practice – clients often assume tempeh is “ready to go” straight from the package, but that steaming or simmering step really does change the game for both digestibility and amino acid availability. The slow cooker approach is brilliant because you’re essentially mimicking traditional fermentation + cooking techniques that cultures have used for centuries. And when you layer that with kimchi’s live cultures, you’re getting both the mechanical breakdown of the tempeh AND the gut support from probiotics, which means better nutrient absorption across the board. Love seeing people connect these dots with their own CGM data too.
Love this combo, Carla. One thing I always stress with tempeh specifically: don’t skip the steaming or simmering step before you pan fry it, even just 10 minutes. Opens up the bean structure and makes it way more bioavailable for those amino acids you’re after, plus it takes on flavor like a sponge. The kimchi’s heat also helps break down the tempeh’s harder-to-digest components, so you’re basically stacking digestive efficiency on top of the probiotic load, which is exactly what you want post-workout when your gut’s working overtime anyway.