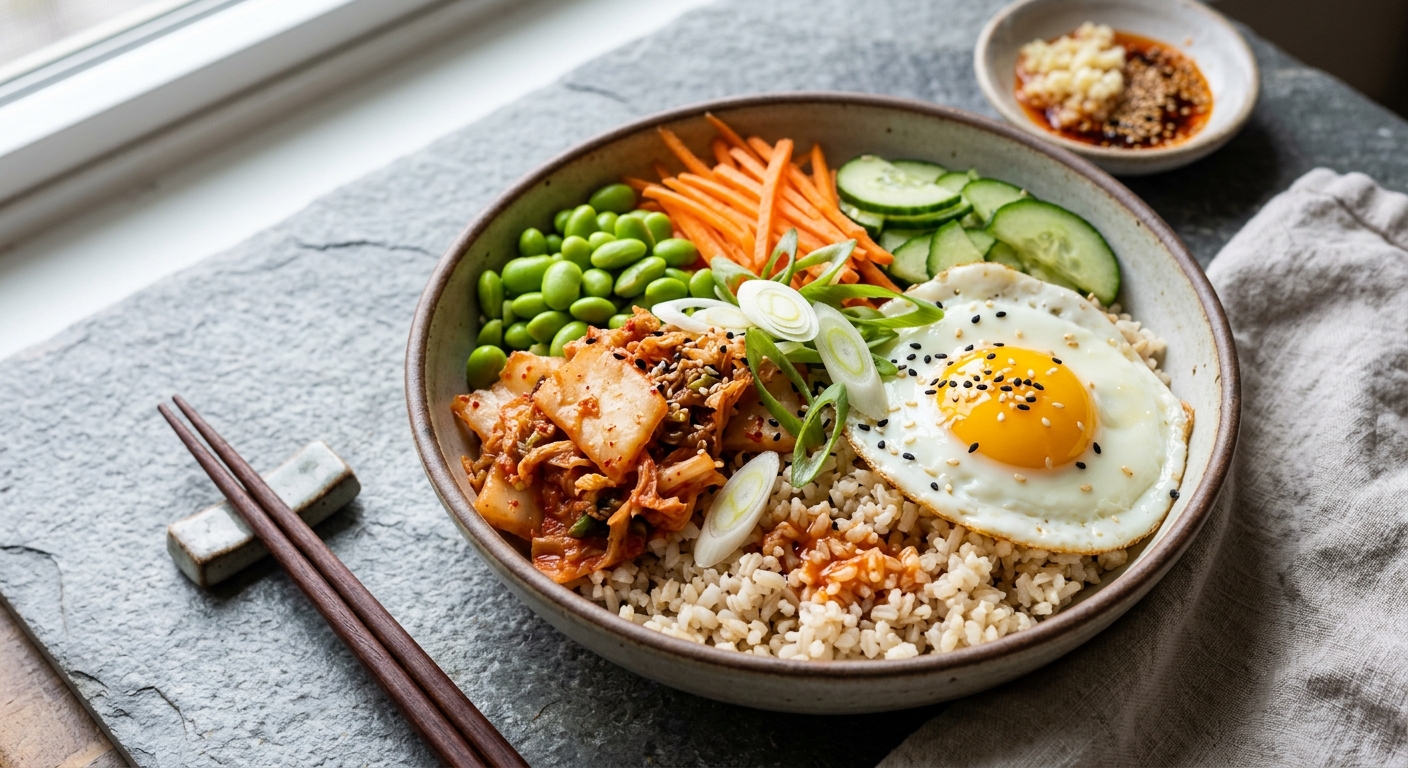
The kimchi and brown rice bowl is one of those rare dishes where culinary tradition and nutritional science arrive at exactly the same destination. Fermented napa cabbage has been a cornerstone of Korean cuisine for centuries, and modern research has confirmed what generations of cooks intuitively understood: the lactic acid bacteria in well-made kimchi, particularly Lactobacillus plantarum and Leuconostoc mesenteroides, actively support gut microbiome diversity, reduce systemic inflammation markers, and improve the bioavailability of the minerals sitting right beside them in the bowl. Paired with whole-grain brown rice, this dish becomes a genuinely complete mineral delivery system.
Brown rice contributes far more than carbohydrate fuel. Its intact bran layer is rich in magnesium (critical for over 300 enzymatic reactions), manganese (essential for superoxide dismutase, your body’s primary intracellular antioxidant enzyme), and phosphorus. The addition of edamame and a soft-cooked egg rounds out the essential amino acid profile, while shredded carrots, scallions, cucumber, and sesame seeds layer in beta-carotene, quercetin, lignans, and additional zinc. Every component earns its place both on the palate and on the nutrition label.
At Calibrated Cuisine, we calibrated this bowl so that a single serving clears 20% or more of your daily value for iron, magnesium, manganese, phosphorus, folate, and vitamin K, while keeping glycemic load firmly in the medium range thanks to the resistant starch in cooled brown rice and the acidity of kimchi, which measurably slows gastric emptying. Whether you build it fresh on the stovetop, let the rice develop in a slow cooker for maximum resistant starch formation, or pressure-cook it to a perfect tender bite in a fraction of the time, the mineral and probiotic payoff is the same.
4
servings
Ingredients
- 400 gshort-grain brown rice, rinsed until water runs clear
- 300 gkimchi (well-fermented, unpasteurised), roughly chopped, juice reserved
- 200 gshelled edamame, fresh or frozen
- 4 largeeggs
- 200 gcarrots, julienned or coarsely grated
- 200 gcucumber, halved lengthways and thinly sliced
- 6 mediumscallions, thinly sliced, white and green parts separated
- 3 clovesgarlic, minced
- 2 tbsptoasted sesame oil
- 2 tbsptamari (gluten-free soy sauce)
- 1 tbspgochujang (Korean red pepper paste)
- 1 tbsprice vinegar
- 1 tbsphoney or maple syrup
- 3 tbsptoasted sesame seeds
- 2 tbspAvocado Oil100% Pure Avocado Oil (avocado or sunflower)
- 800 mlwater or low-sodium vegetable broth (for rice cooking)
- —Colima Sea SaltMicroplastic Free Salt and white pepper to taste
- —Nori sheets or furikake, optional for serving
Instructions
Click on an item below to shop for the recommended items for this recipe on Amazon.
As an Amazon Associate, we earn from qualifying purchases.
- Combine the rinsed brown rice and 800ml water or broth in a medium heavy-bottomed saucepan. Bring to a vigorous boil over high heat, then immediately reduce the heat to the lowest possible setting, cover tightly with a lid, and cook undisturbed for 40 to 45 minutes until all liquid is absorbed and the rice is tender with a slight chew. Remove from heat and allow to steam, still covered, for 10 minutes. Fluff gently with a fork.
- While the rice cooks, prepare the gochujang drizzle: whisk together the gochujang, tamari, rice vinegar, honey, and 1 tablespoon of the sesame oil in a small bowl until smooth. Taste and adjust the balance of sweet, salty, and spicy to your preference. Set aside.
- Bring a separate medium saucepan of water to a boil. Lower the eggs gently into the boiling water and cook for exactly 7 minutes for a jammy, slightly flowing yolk. Transfer immediately to an ice bath and let cool for 5 minutes before peeling. If using frozen edamame, blanch them in the same boiling water for 3 minutes, drain, and season lightly with sea salt.
- Heat the neutral oil in a wide skillet over medium-high heat until shimmering. Add the white parts of the scallions and the minced garlic, stirring constantly for 60 seconds until fragrant but not browned. Add the julienned carrots and stir-fry for 2 to 3 minutes until just softened but still with a slight bite. Season lightly with salt and white pepper. Remove the pan from heat.
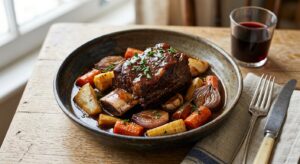
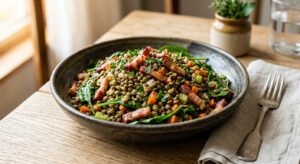
- To assemble, divide the warm fluffed brown rice evenly among four wide bowls. Arrange the stir-fried carrots, cucumber slices, and edamame in separate sections around the bowl. Nestle a halved soft-cooked egg in the center of each bowl. Spoon approximately 75g of chopped kimchi (with a little of its reserved juice) alongside the vegetables. Drizzle everything generously with the gochujang sauce and the remaining tablespoon of sesame oil. Finish with toasted sesame seeds and the sliced green scallion tops. Serve immediately.
- Lightly coat the insert of a 4 to 6 quart slow cooker with a thin film of neutral oil to prevent sticking. Add the rinsed brown rice, 800ml of water or broth, and a pinch of fine sea salt. Stir once to distribute. Place the lid on and set to High for 3 hours or Low for 5 to 6 hours. Do not lift the lid during cooking as this releases the steam needed to hydrate the grains evenly.
- About 30 minutes before the rice is done, prepare all toppings. Whisk together the gochujang, tamari, rice vinegar, honey, and 1 tablespoon sesame oil to make the drizzle sauce. Bring a saucepan of water to a boil on the stovetop. Cook the eggs for 7 minutes, transfer to an ice bath, and peel when cool. If using frozen edamame, blanch for 3 minutes, drain, and season.
- While the eggs cool, heat neutral oil in a skillet over medium-high heat and stir-fry the white scallion parts and garlic for 60 seconds, then add the carrots and cook for 2 to 3 minutes until just tender. Season with salt and white pepper. Remove from heat.
- Check the rice at the end of the cooking window. It should have absorbed all the liquid and be tender throughout. If any liquid remains, replace the lid and cook on High for an additional 20 minutes. Once done, stir in 1 tablespoon of the reserved kimchi juice directly into the rice to season it and add a subtle tang. Fluff with a fork.
- Spoon the seasoned rice into four bowls. Arrange the stir-fried carrots, sliced cucumber, and edamame in separate sections. Add the halved soft-cooked egg and 75g of kimchi per bowl. Drizzle with the gochujang sauce and remaining sesame oil, then scatter sesame seeds and green scallion tops over everything. Serve while the rice is still warm. Kimchi is added at serving, not into the slow cooker, to preserve all live cultures.
- Combine the rinsed brown rice and 500ml of water or broth (note this is less than the stovetop quantity because no evaporation occurs under pressure) in the inner pot of your electric pressure cooker. Add a pinch of salt. Secure the lid and ensure the steam valve is set to Sealing. Select Manual or Pressure Cook on High Pressure and set the timer to 22 minutes.
- While the cooker comes to pressure and the rice cooks, prepare the gochujang drizzle by whisking together the gochujang, tamari, rice vinegar, honey, and 1 tablespoon sesame oil. Prepare the eggs simultaneously: bring a small saucepan of water to a boil and cook the eggs for 7 minutes. Transfer to an ice bath to halt cooking and peel when cool. Blanch frozen edamame for 3 minutes in the same water if needed.
- When the pressure cooker timer ends, allow it to release pressure naturally for 10 minutes (do not touch the valve), then carefully switch to Quick Release to vent any remaining steam. Open the lid away from you. The rice should be fully cooked and dry. Immediately fluff with a fork and stir in 1 tablespoon of the reserved kimchi juice and the remaining tablespoon of sesame oil to season and gloss the grains.
- Using the Saute function on your electric pressure cooker (or a separate skillet for stovetop models), heat the neutral oil and fry the white scallion parts and garlic for 60 seconds, then add the carrots and cook for 2 minutes, stirring constantly. Season with salt and white pepper.
- Divide the rice among four bowls and arrange the sauteed carrots, sliced cucumber, and edamame over and around it. Place the halved eggs in the center of each bowl, spoon 75g of kimchi alongside the toppings, drizzle generously with the gochujang sauce, and finish with sesame seeds and sliced green scallion tops. Serve immediately for optimal texture contrast.
- Preheat your oven to 180C (350F) with a rack positioned in the center. Bring the 800ml of water or broth to a boil in a kettle. In a 4 to 5 quart Dutch oven or heavy oven-safe pot, heat the neutral oil over medium heat on the stovetop. Add the white scallion parts and garlic and saute for 90 seconds until fragrant. Add the rinsed brown rice and stir to coat the grains in the oil and aromatics, toasting them gently for 2 minutes until you can smell a faint nuttiness.
- Pour the boiling broth over the toasted rice in the Dutch oven. Season generously with salt and stir once to combine. Lay a double layer of aluminium foil directly over the pot opening before placing the lid on top. This dual seal traps steam more effectively than a lid alone and prevents the oven’s dry heat from creating a hard, dry crust on the grain surface. Transfer immediately to the oven.
- Bake for 60 to 65 minutes without opening the oven or lifting the lid. The foil-and-lid seal is critical: interrupting it mid-bake allows steam to escape and can leave the rice undercooked in the upper layers. At 60 minutes, carefully remove the pot, uncover (steam will escape vigorously), and test a few grains from the center. They should be tender with a slight chew. If the grains are still firm, re-cover and return to the oven for 5 more minutes.
- While the rice bakes, prepare all toppings. Whisk together the gochujang drizzle sauce. Bring a saucepan of water to a boil on the stovetop, cook the eggs for 7 minutes, and cool them in an ice bath before peeling. Blanch edamame for 3 minutes in the same water. Prepare the cucumber and carrots. For the carrots, you can toss them raw with a little rice vinegar and sesame oil as a quick pickle rather than stir-frying, which complements the more restrained oven method beautifully.
- Once the rice is done, fluff it gently with a fork and stir in 1 tablespoon of reserved kimchi juice and the remaining tablespoon of sesame oil to season and add brightness. Divide among four bowls and top with carrots, cucumber, edamame, halved eggs, and kimchi arranged in distinct sections. Drizzle with the gochujang sauce, finish with sesame seeds and green scallion tops, and serve while the rice is still steaming.
Nutrition Breakdown
Per 1 serving (makes 4)
Vitamins & Minerals
% Daily Value based on a 2,000 calorie diet (FDA reference)
🧬 Essential Amino Acids
% of recommended daily intake (RDA) per serving
🛡 Antioxidant Profile
The Nutrition Science
The anti-inflammatory mechanism of this bowl operates on multiple simultaneous pathways. The most studied is the gut-inflammation axis: well-fermented kimchi introduces several billion colony-forming units of Lactobacillus species per 75g serving, which colonise the colon transiently, producing short-chain fatty acids (particularly butyrate and propionate) that directly suppress inflammatory cytokine production in colonic epithelial cells and reduce intestinal permeability. A permeable gut lining, sometimes called ‘leaky gut,’ allows lipopolysaccharides from gram-negative bacteria to enter systemic circulation and trigger chronic low-grade inflammation, which is now understood to underlie insulin resistance, cardiovascular disease, and several autoimmune conditions. Regularly consuming fermented foods with live cultures is one of the most evidence-supported dietary strategies to maintain tight junction integrity.
Brown rice contributes to this anti-inflammatory framework through its magnesium content. Magnesium deficiency is one of the most prevalent micronutrient deficiencies in Western populations and is strongly associated with elevated C-reactive protein and interleukin-6 levels. One serving of this bowl provides approximately 130mg of magnesium, roughly 31% of the daily value, primarily from the rice bran and the edamame. Manganese, also abundant here at 135% DV, is the essential cofactor for mitochondrial superoxide dismutase (MnSOD), the enzyme that neutralises superoxide radicals generated during normal cellular respiration before they can damage mitochondrial DNA. Without adequate manganese, this critical enzymatic antioxidant defence is structurally compromised.
The kimchi fermentation process itself increases the bioavailability of key minerals in the napa cabbage through phytate degradation. Raw cruciferous vegetables contain phytic acid, which binds minerals like iron, zinc, and calcium and reduces their intestinal absorption. Lactic acid fermentation progressively hydrolyses these phytates over the fermentation period, unlocking minerals that would otherwise pass through unabsorbed. This means that aged, well-fermented kimchi is nutritionally superior to fresh kimchi for mineral bioavailability, a compelling reason to choose kimchi that has been fermenting for at least two weeks and carries a notably sour aroma. The vitamin C preserved in the kimchi brine further enhances non-haem iron absorption from the edamame and brown rice by reducing ferric iron (Fe3+) to the more absorbable ferrous form (Fe2+) at the intestinal brush border.
Pro Tips
- Never cook kimchi into the rice or add it while the bowl is hot. Temperatures above 60C kill lactic acid bacteria. Add kimchi at the very end, directly to the bowl, to preserve the probiotic cultures that make this dish nutritionally exceptional.
- For significantly higher resistant starch content, cook the brown rice the night before and refrigerate it. Chilled cooked rice forms retrograde starch crystals that resist digestion in the small intestine, feeding beneficial gut bacteria instead and further lowering the effective glycemic load by an estimated 10 to 15%.
- Choose unpasteurised kimchi sold in the refrigerated section of Korean or Asian grocery stores. Shelf-stable kimchi in cans or jars has been heat-treated and contains no live cultures. Check the label for the phrase ‘contains live cultures’ or look for a slightly bulging lid, which signals active fermentation.


ok this is hitting different as a post-WOD meal, the complete amino acid profile from that egg plus the fermented probiotics is gonna absolutely support muscle recovery and gut barrier function. ive been timing fermented foods like 30-60 mins after lifting and my inflammation markers have been way better, plus the bioavailable iron and magnesium combo here means less soreness the next day. the gochujang drizzle is clutch too, those capsaicinoids are no joke for managing inflammation. definitely adding this to my meal prep rotation!
omg YES this is exactly the kind of bowl i’ve been trying to master!! the fermented kimchi plus brown rice combo is literally chef’s kiss for magnesium absorption, and my kids actually eat this without complaining which is a total win. i always add extra sesame seeds (those are SO mineral dense!) and sometimes throw in some spinach under the rice so they dont even notice theyre getting more iron. have you found that the gochujang drizzle changes the probiotic content at all? like does heat affect those cultures or is room temp drizzle the way to go? desperate to nail this for my family’s gut health lol
This looks amazing, and I love that you’re incorporating fermented foods! Quick question though, since I manage Hashimoto’s: is the gochujang in the drizzle nightshade-free, or would you recommend a substitute for anyone following AIP? I’ve found that while brown rice works well for me now, some people with thyroid issues do better with white rice for easier digestion, so that might be worth mentioning too. The probiotic plus mineral combo you’ve outlined is exactly what my gut needs, especially post-flare!